注:本文包含 AI 辅助创作
- 参考链接:
Paper Summary
- 整体总结:
- 本文提供了一个全面开源的收集 OpenSWE 训练轨迹的方案
- 注:除了数据外,还开源了各种 Pipeline 代码
- 背景:
- 训练 SWE Agent 需要大规模、可执行且可验证的环境,这些环境能为迭代代码编辑、测试执行和解决方案优化提供动态反馈循环
- 现有开源数据集规模和仓库多样性有限,工业解决方案不透明的(基础设施未公开)
- OpenSWE 是目前最大的、完全透明的 Python SWE Agent 训练框架
- 包含 45,320 个可执行的 Docker 环境,涵盖超过 12.8k 个仓库
- 所有 Dockerfile、评估脚本和基础设施均完全开源,以确保可复现
- OpenSWE 是通过一个部署在 64 节点分布式集群上的多 Agent 合成 Pipeline 构建的
- 该 Pipeline 自动化了仓库探索、Dockerfile 构建、评估脚本生成和迭代测试分析
- 本文还提出了一个以质量为中心的过滤 Pipeline
- 该 Pipeline 能够刻画每个环境的内在难度,过滤掉无法解决或难度不足的实例,仅保留那些能最大化学习效率的实例
- 环境构建花费约 \( 891\text{K} \) 美元,额外的轨迹采样和难度感知筛选花费约 \( 576\text{K} \) 美元,整个项目的总投资约为 \( 1.47 \) 百万美元,从大约 9,000 个质量有保障的环境中生成了约 13,000 条精选轨迹
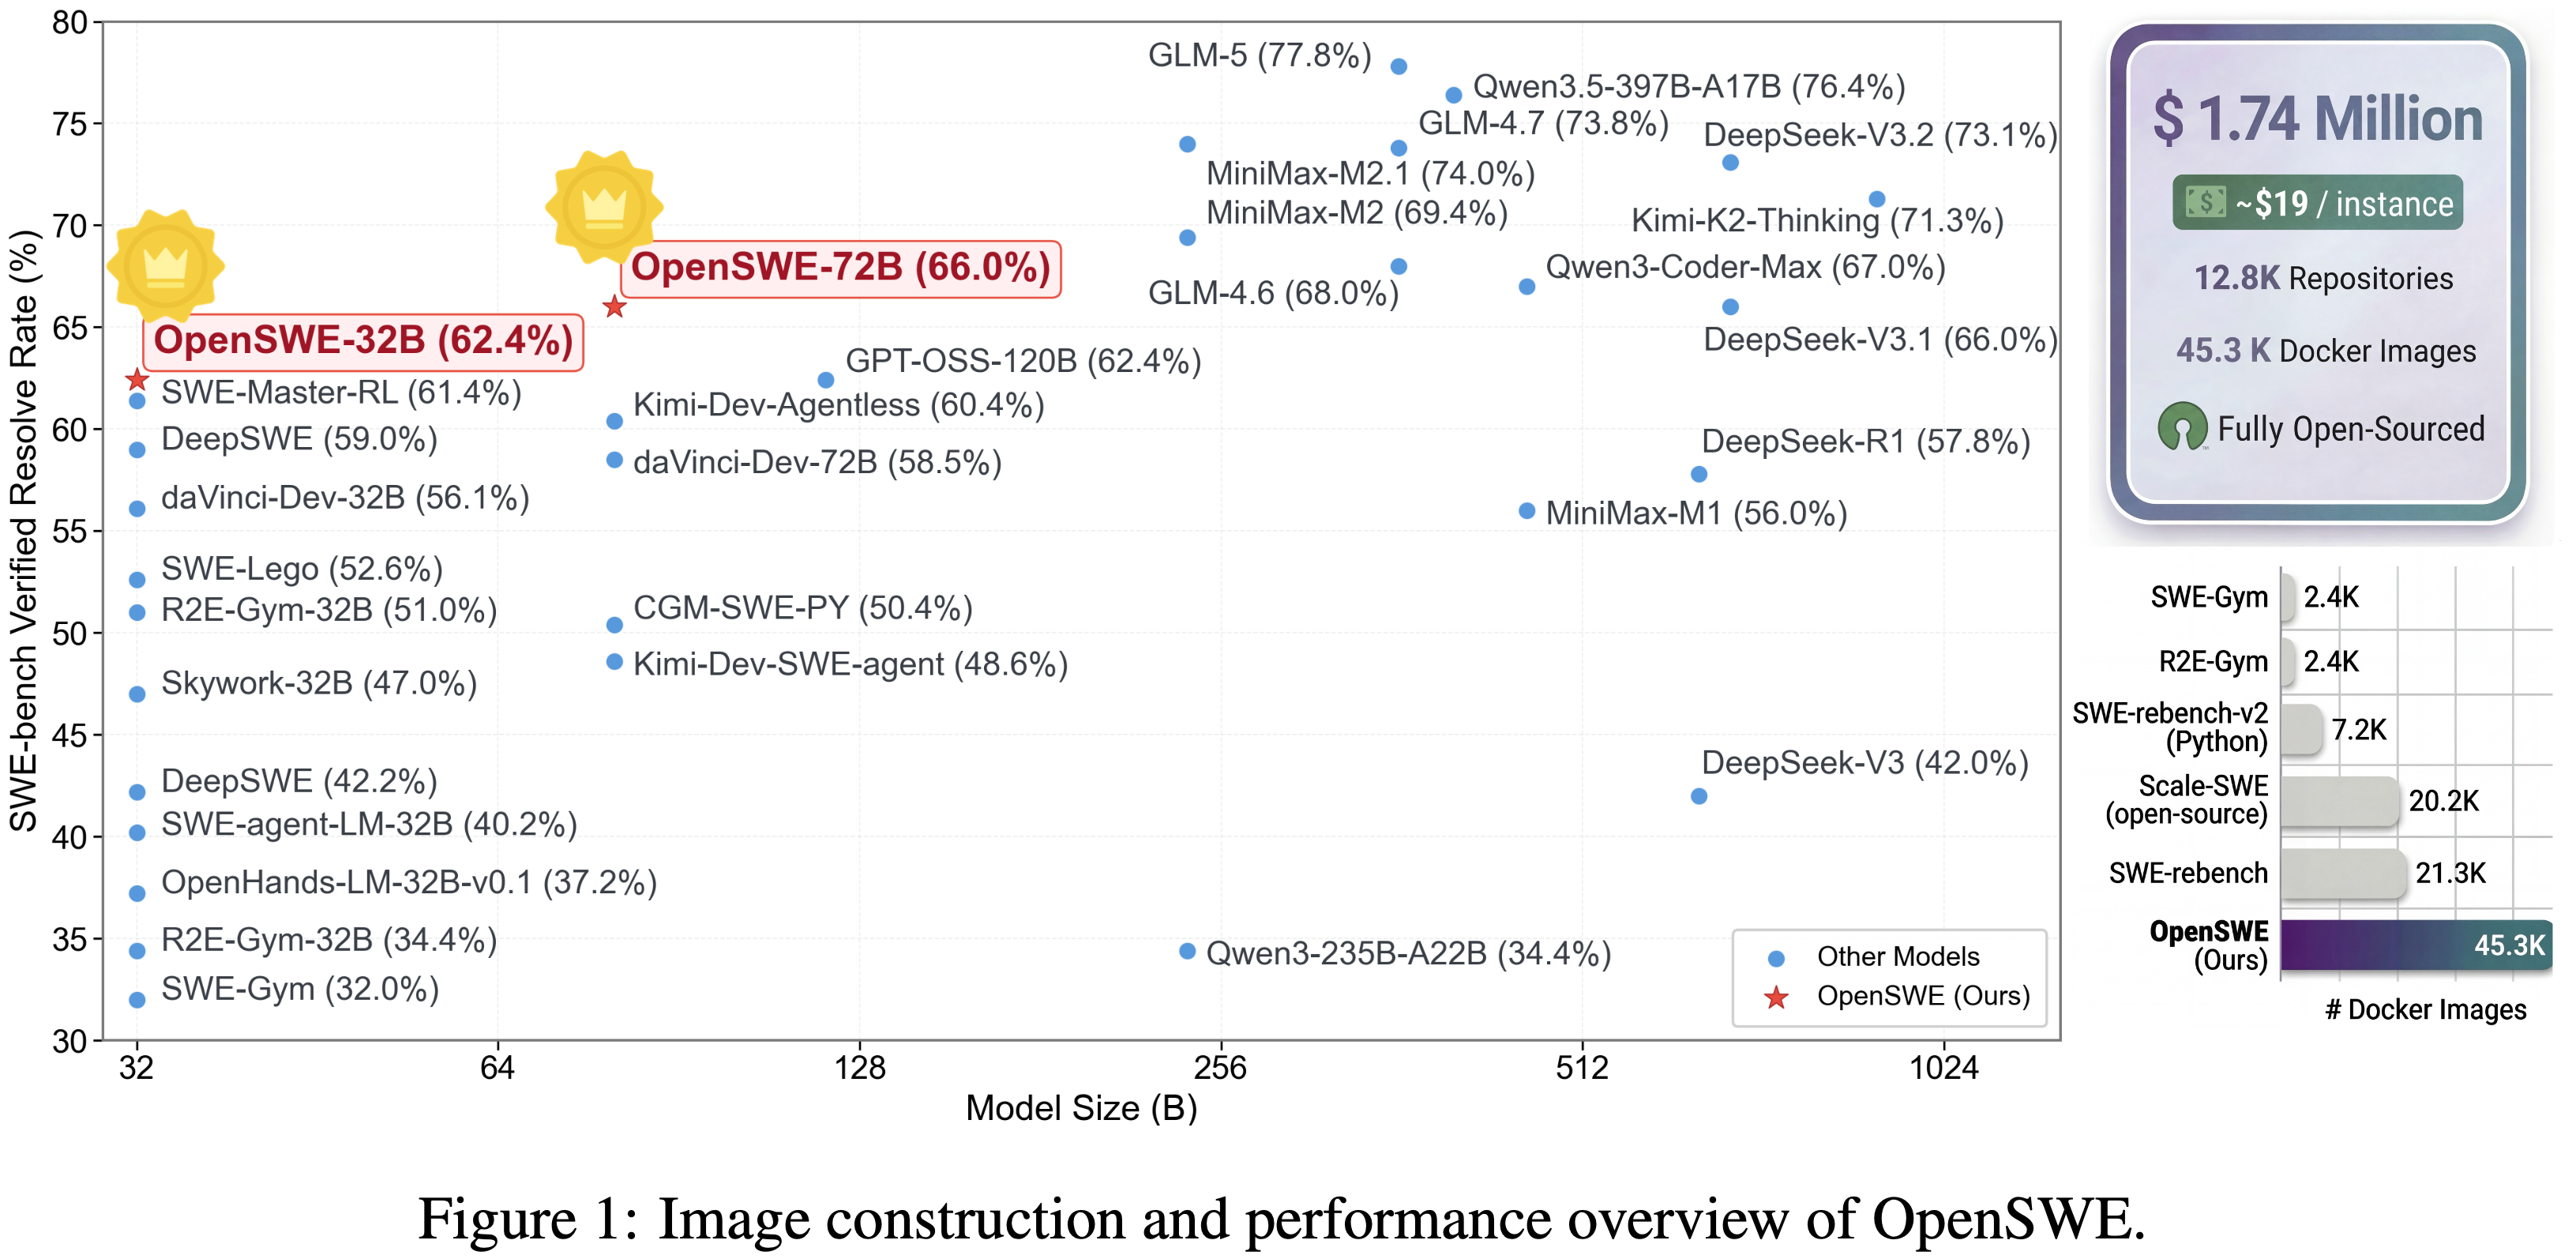
- OpenSWE-32B 和 OpenSWE-72B 在 SWE-bench Verified 上分别达到了 \(62.4\%\) 和 \(66.0\%\),在 Qwen2.5 系列模型中建立了新的 SOTA
- 在 OpenSWE 上训练的模型优于在 SWE-rebench 上训练的模型
- 呈现出对数-线性数据缩放趋势且未观察到饱和
- 特别:针对 SWE 的训练带来了显著的领域外提升,包括在数学推理上最高提升 12 个点,在科学基准上提升 5 个点,且不影响事实 Recall 能力(factual recall)
- 理解:
- 数学能力提升可能跟代码能力本身也需要一些推理等能力有关
- 事实 Recall 能力则是类似(MMLU 和 TriviaQA 等 Benchmark),这个能力更多是预训练注入的,训练 SWE 能力不会影响模型这方面的指标
- 理解:
- 本文提供了一个全面开源的收集 OpenSWE 训练轨迹的方案
Introduction and Discussion
- SWE Agent 的开发 (2024;2025a;2026) 系统能够理解复杂需求、Navigate 大型代码库、迭代地编辑代码、运行测试并在无需人工干预的情况下优化解决方案 (2025)
- 与静态代码生成不同,这些 Agent 需要像 Docker (2023;2024) 这样的可验证和可执行环境来提供动态反馈循环:
- 必须编译代码、执行测试并观察运行时行为,以迭代地优化解决方案 (2023)
- 大规模构建高质量且多样化的可执行环境仍然是一个关键瓶颈:
- 注:SWE-rebench (2025)、SWE-Universe (2026b) 和 SWE-Factory (2026) 实现了一定的自动化,但仍然存在一些问题
- 构造环境成本过高
- 环境质量不够
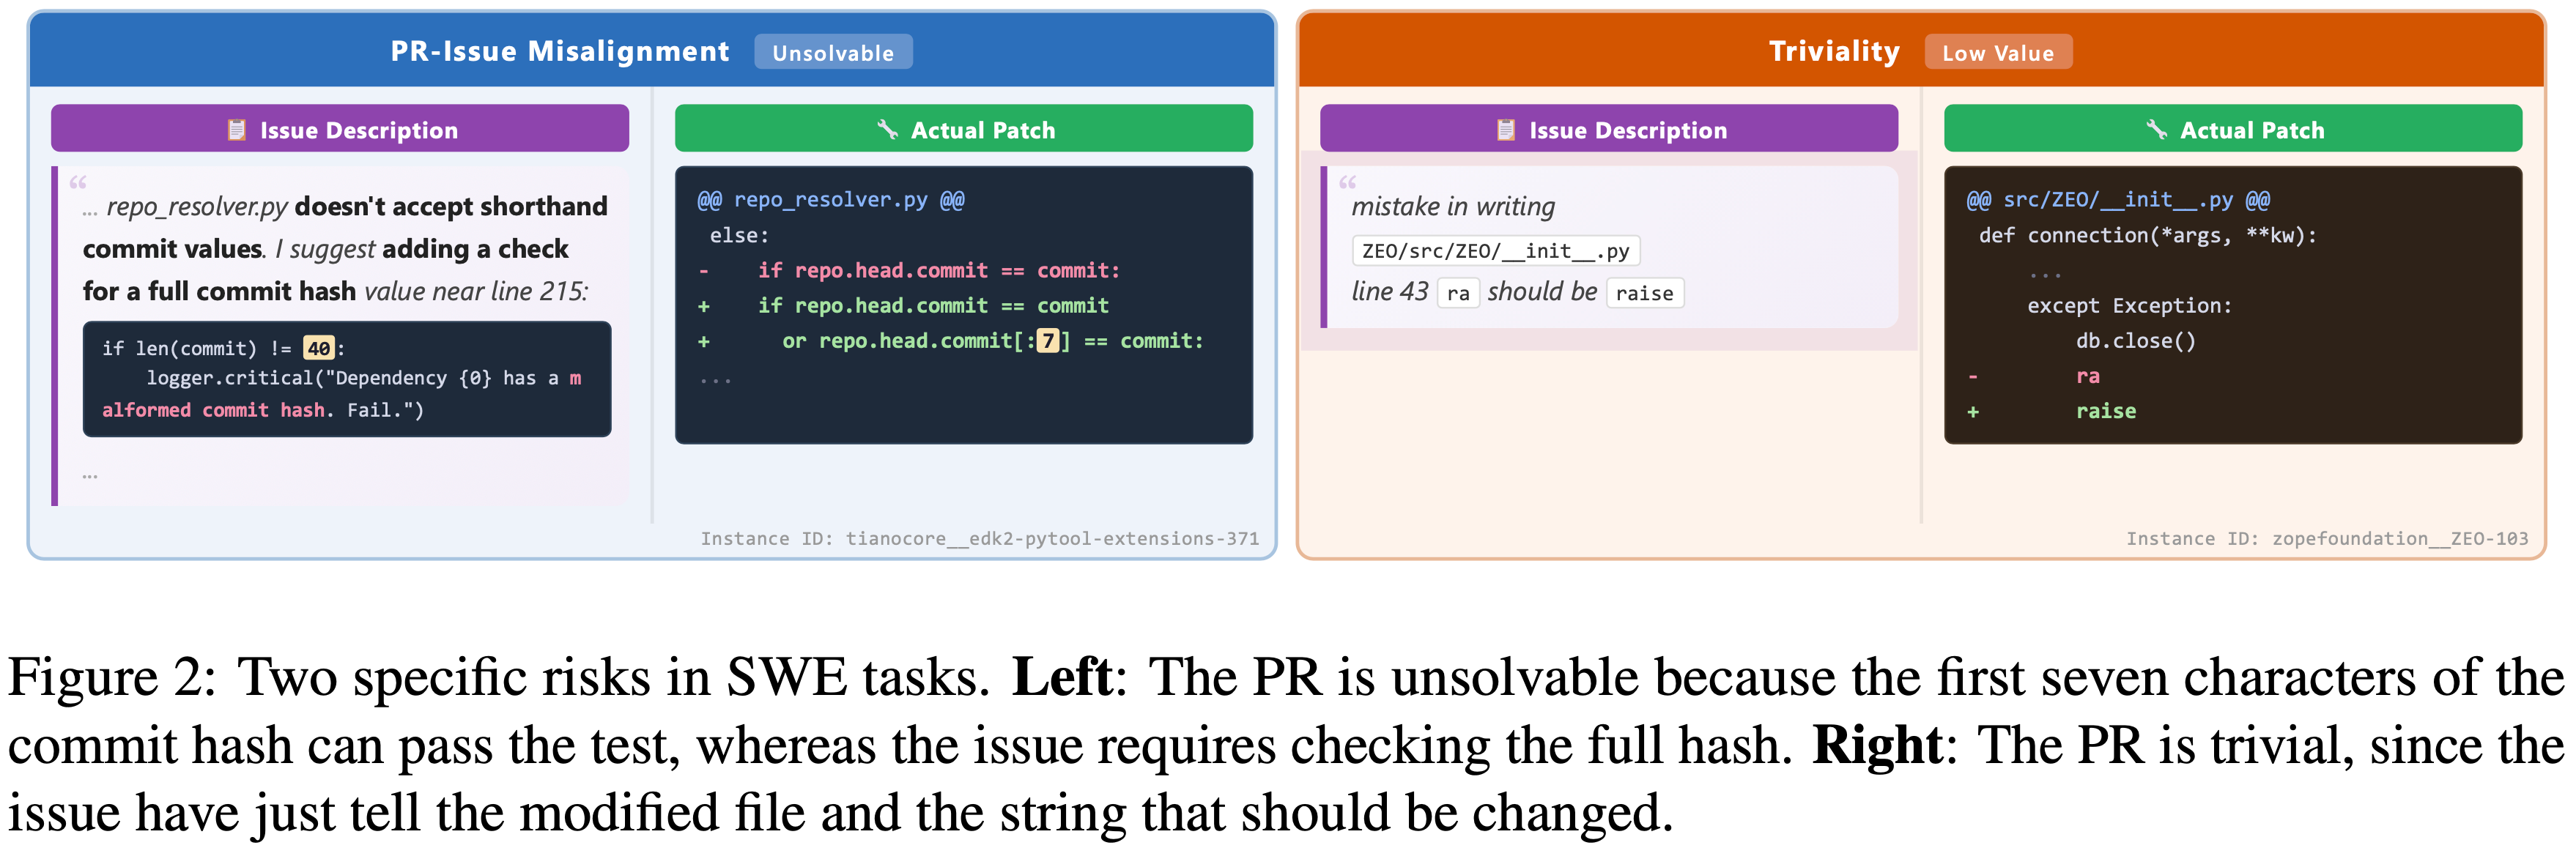
- 如图 2 所示,从真实仓库合成的环境常常存在多种问题:
- PR-Issue 错配:即提交的补丁实际上并未解决所描述的问题
- triviality:即问题描述直接揭示了解决方案
- 图 2:SWE 任务中的两个特定风险
- 左:该 PR 无法解决,因为 commit hash 的前七个字符即可通过测试,而问题要求检查完整的 hash
- 右:该 PR Trivial,因为问题直接指出了要修改的文件和应更改的字符串
- 如图 2 所示,从真实仓库合成的环境常常存在多种问题:
- 注:SWE-rebench (2025)、SWE-Universe (2026b) 和 SWE-Factory (2026) 实现了一定的自动化,但仍然存在一些问题
- 环境中难度的分布在训练效果中起着决定性作用,而识别出能最大化学习效率的适当难度子集,需要系统的评估和精心的筛选
- 本文通过引入 OpenSWE 来应对成本和质量这两个挑战
- OpenSWE 包含 45,320 个可执行的 Docker 环境,涵盖 12.8k 个仓库,其构建成本超过 \( 891,000 \) 美元,所有 Dockerfile、评估脚本和分布式基础设施均完全开源
- 本文发布最终的环境和完整的合成 Pipeline :
- 一个部署在 64 节点集群上的多 Agent 系统,该系统自动化了仓库探索、Dockerfile 构建、评估脚本生成和迭代测试分析
- 同时提出一个以质量为中心的过滤 Pipeline
- 该 Pipeline 能够刻画每个环境的内在难度,过滤掉那些无法解决或难度不足的实例,仅保留那些处于适当难度水平、能提供最有效学习信号的环境
- 这一大规模的轨迹采样和筛选过程需要额外的约 \( 576,000 \) 美元的计算投入,最终从大约 9,000 个高质量环境的子集中生成了约 13,000 条精选轨迹
- 在这些轨迹上进行的大量实验验证了 OpenSWE 的有效性,并凸显了数据缩放和难度感知筛选的互补作用
- 在精选轨迹上训练的模型在 SWE-Bench Verified 上达到了 \(62.4\%\)(32B)和 \(66.0\%\)(72B)的解决率
- 在有监督微调方法中建立了 SOTA,并且在不同配置下均一致地优于在 SWE-rebench 上训练的模型
- 数据缩放分析显示了对数-线性改进趋势且未出现饱和,这证实了额外的高质量环境能够持续带来有意义的收益
- 难度感知筛选在原始规模之外做出了可衡量的贡献:
- 通过保留处于适当难度前沿的环境,训练效率相比不加区分地使用所有环境有了显著提升
- 在 OpenSWE 上训练带来了显著的领域外改进,包括在数学推理上最高提升 12 个点,在科学基准上最高提升 5 个点,且不影响事实 Recall 能力
- 在精选轨迹上训练的模型在 SWE-Bench Verified 上达到了 \(62.4\%\)(32B)和 \(66.0\%\)(72B)的解决率
- 贡献如下:
- Unprecedented Scale with Full Transparency,前所未有的规模与完全透明性
- 本文发布了来自 12.8k 个仓库的 45,320 个可执行环境,构建成本为 \( 891K \) 美元,并附带完整的基础设施,包括所有 Dockerfile、评估脚本和分布式合成 Pipeline ,确保了可重现性和社区驱动的改进
- Quality-Centric Filtering via Difficulty-Aware Curation
- 提出了一种过滤 Pipeline ,通过刻画环境难度来过滤掉无法解决和过于简单的实例
- 通过额外的 \( 576K \) 美元的轨迹采样和筛选投入,从大约 9,000 个高质量环境中获得了约 13,000 条精选轨迹
- Strong Empirical Validation with Scaling and Curation Insights
- 在 OpenSWE 上训练的模型在 Qwen2.5 系列模型上的 SFT 方法中建立了新的 SOTA 结果(分别为 62.4% / 66.0%),在不同规模和不同 Agent 框架下均一致地优于 SWE-rebench,并表现出无饱和的对数-线性缩放特性
- Insight:数据缩放和难度感知过滤均是提升 Agent 性能的必需且互补的驱动因素
- Unprecedented Scale with Full Transparency,前所未有的规模与完全透明性
Related Work
Environment Synthesis
- 核心目标:为 Agent 构建可执行环境
- SWE-bench (2023) 通过筛选真实的 GitHub 问题及其对应的 PR 来构建基准
- 每个任务实例都嵌入在一个基于 Docker 的仓库快照中,并配有可作为评估标准(oracle)的可执行测试套件
- SWE-rebench (2025) 引入了一个可扩展的 Pipeline
- 将 SWE-bench 的构建过程复制到更广泛的仓库集合中,旨在生成数千个带有可执行测试环境的额外任务实例
- SWE-Universe (2026b) 采取了一种互补的方法,通过系统地爬取和过滤 GitHub 仓库,以生成多样化的候选环境集合
- SWE-Factory (2026) 和 Scale-SWE (2026) 进一步自动化了从仓库选择到 Dockerfile 合成和测试工具生成的端到端 Pipeline
- Scale-SWE 通过一个沙盒化的多 Agent 工作流扩展了这一范式
- BeyondSWE (2026a) 将评估范围从单一仓库的错误修复扩展到更复杂的现实世界场景
- 如跨仓库推理、依赖迁移和特定领域的开发任务
- SWE-World (2026) 提出了一个正交方向,即用基于 Agent-环境交互数据训练的代理模型(learned surrogate models)替代物理 Docker 执行,从而消除了 Docker 环境维护的资源密集型成本,同时保留了 Agent-环境反馈循环
SWE Agents Training
- 自主 SWE Agent 的开发已经从简单的代码补全迅速发展为在真实世界仓库中解决复杂的多步骤任务
- Agent 框架(scaffolds)已成为关键基础设施:For LLM 能够有效地与仓库交互
- SWE-agent (2024) 作为一个基础示例,建立了一个基线
- Agent 可以在该基线上自主 Navigate 代码库、定位错误并生成补丁
- OpenHands (2025b) 提供了一个可扩展的开源平台,利用 CodeAct 框架,允许 Agent 在统一的动作空间内交错执行代码和进行自然语言推理
- 在训练和数据合成方面
- SWE-smith (2025a) 构建了一个大规模的训练数据合成 Pipeline ,生成多样化的任务实例和执行轨迹
- 用于 SWE Agent 的有监督微调,使得从头开始训练开放权重的 SWE Agent 成为可能
- daVinci-Dev (2026) 采取了不同的方法,将结构化规划与迭代代码生成和调试相结合,利用多步推理轨迹来产生高质量的解决轨迹
- SWE-Fixer (2025) 专注于使用经过筛选的高质量解决轨迹来扩展有监督微调
- SWE-Master (2026) 技术报告系统地比较了这些代表性方法
- SWE-smith (2025a) 构建了一个大规模的训练数据合成 Pipeline ,生成多样化的任务实例和执行轨迹
Method
GitHub PR Collection
- 本文通过 GitHub REST 和 GraphQL API 从广泛的 Python 仓库中收集 GitHub PR
- 对于每个仓库
- 获取 PR 元数据
- 并有选择地查询额外的端点以获取详细内容,包括(如果可用)关联的问题描述,以及完整的提交序列和相应的 diff
GitHub PR Filtering
- 过滤过程作用于通过上述收集 Pipeline 获得的 GitHub PR 数据集
- 每个条目包含四个关键字段:仓库标识符、PR 编号、关联的问题以及包含所有代码修改的完整 PR 补丁
- 为了保证 PR 的质量和适用性,应用了一个四阶段过滤 Pipeline :
- 仓库可行性(Repository Viability)
- 为了提高数据集的代表性,仅保留至少有 5 个 GitHub 星标 的仓库,使用星标数作为社区验证和项目成熟度的代理指标
- 此标准排除了不太可能反映现实世界软件工程实践的、不成熟或无人维护的项目
- 语言过滤(Language Filter)
- 将数据集限制为主要编程语言为 Python 的仓库中的 PR,该语言由 GitHub 的语言检测确定
- 这与现有代码生成基准测试中占主导地位的语言覆盖范围保持一致,并确保了评估的一致性
- 问题要求(Issue Requirement)
- 由于每个任务都应基于一个定义良好的自然语言问题陈述,因此每个 PR 必须至少有一个关联的问题及其描述
- 缺少链接问题或仅包含空问题描述的 PR 将因缺乏足够的任务规格而被排除
- 实质性代码更改(Substantive Code Changes)
- 为了保证每个实例测试的是真正的实现能力而非辅助性的测试工作,要求对非测试代码进行非空补丁,并排除更改完全局限于测试目录或测试文件(如其路径中包含
*tests*,*spec*,或*e2e*)的 PR
- 为了保证每个实例测试的是真正的实现能力而非辅助性的测试工作,要求对非测试代码进行非空补丁,并排除更改完全局限于测试目录或测试文件(如其路径中包含
- 仓库可行性(Repository Viability)
- 在识别出高质量的 PR 候选后,使用一个多 Agent 系统将选定的 PR 转换为真实的 SWE 环境
- 每个环境都需要一个具有正确依赖关系的可重现 Docker 容器,以及一个能够确认 Agent 解决方案是否正确的、经过验证的评估脚本
Repository Exploration
- 引入一个轻量级的仓库探索 Agent,它连接了原始仓库状态和下游环境生成
- 该 Agent 使用仓库级别的元数据(仓库名称、提交/版本以及从补丁派生的文件提示)进行初始化,并对本地代码库执行有界的探索,仅为后续 Agent 收集与设置和测试相关的证据
Targeted Retrieval Interface
- 该 Agent 通过三个受限的仓库 API 进行操作:
- (1)
browse用于结构检查 - (2)
search用于定位候选配置文件 - (3)
digest用于从选定文件中提取可操作的设置和测试指令
- (1)
- 这个接口故意设计得狭窄,以鼓励围绕高价值工件(如 README.md, CONTRIBUTING.md,依赖清单和 CI 工作流)进行低成本检索
Cost-Aware Iterative Policy
- 探索进行多轮,并遵循保守策略:
- 在没有明确失败反馈的情况下,Agent 进行浅层的、文档优先的检查
- 当测试分析 Agent 报告缺少上下文时,检索会被重定向到仅请求的文件或配置维度
- 这种设计减少了冗余的仓库遍历,同时保留了在后续迭代中从环境或测试命令歧义中恢复的能力
Minor Implementation Details, 次要实现细节
- 在此阶段包含了几个小的实现细节:
- (1)提取范围明确地捕获了除测试框架之外的 Python 特定环境管理框架(如 poetry, uv),以帮助 Docker 构建 Agent 提前获取足够的上下文
- (2)API 调用解析和参数验证被包含在异常安全处理中,以防止格式错误的调用终止检索轮次
Dockerfile Construction
- Dockerfile Agent 负责为每个任务生成环境
- 在初步研究期间,本文发现了两种反复出现的失败模式:
- (1)环境构建期间的网络不稳定,通用基础镜像需要在构建时下载 Python 和依赖项,导致频繁超时
- (2)冗余重建,未更改的基础层在每次迭代时都被从头重建
- 这些低效问题在大规模下尤为昂贵,本文为 Dockerfile Agent 配备了以下策略
- Base Image Strategy
- 不从通用 Ubuntu 镜像开始,而是预构建了一套 openswe-python 基础镜像,涵盖 Python 2.7 和 3.5-3.14,每个镜像都捆绑了 conda 包、预激活的
testbed环境,并为可靠性配置了包镜像- 这消除了构建失败的最常见原因(依赖项安装期间的网络超时)
- 并使得在共享相同 Python 版本的任务之间能够即时复用层
- 不从通用 Ubuntu 镜像开始,而是预构建了一套 openswe-python 基础镜像,涵盖 Python 2.7 和 3.5-3.14,每个镜像都捆绑了 conda 包、预激活的
- Repository Provisioning
- 不在构建时在容器内克隆仓库,而是维护一个本地裸仓库缓存,并通过
COPY注入代码库,每个任务的 target commit 已提前检出- 这完全从 Agent 循环中移除了 GitHub API 速率限制和网络故障,并通过消除对外部可用性的依赖提高了可重现性
- 还通过避免重复长 commit hash 降低了 Agent 的错误率
- 不在构建时在容器内克隆仓库,而是维护一个本地裸仓库缓存,并通过
- Layer-Aware Prompting and Python-Specific Optimizations
- 观察:在典型的 Agentic 工作流中,dependency specifications 被修订的频率远高于 Dockerfile 结构本身
- 解法:
- 本文明确指示 Agent 将稳定的基础层放在 Dockerfile 的前面,以便它们可以被 Docker 缓存,并将依赖项安装隔离到可以在迭代中廉价重建的后续层
- 当 Agent 在不改变基础环境的情况下迭代依赖项修复时,这带来了显著的加速
- Prompt 还强制了 Python 特定的正确性要求,包括正确的 conda 环境激活、开发模式包安装以及将测试执行推迟到评估脚本
- 本文明确指示 Agent 将稳定的基础层放在 Dockerfile 的前面,以便它们可以被 Docker 缓存,并将依赖项安装隔离到可以在迭代中廉价重建的后续层
- Base Image Strategy
- Dockerfile Agent 接收仓库探索 Agent 的发现(例如,来自 README.md 的特殊依赖项)作为额外输入
- 使 Agent 能够做出更明智的初始决策,并且它将迭代地操作以构建 Dockerfile
- 如果最终测试执行失败,Dockerfile Agent 还将接收来自测试分析 Agent 的反馈,并在后续尝试中优化其输出
Evaluation Script Construction
- 评估脚本 Agent 生成验证修复正确性的 bash 脚本
- 方法是通过执行测试并确认由问题引入的失败可以被正在评估的补丁解决
- 核心挑战在于精确的测试定位:
- 只应执行与问题直接相关的测试用例
- Agent 需识别与问题关联的特定测试文件,并在必要时合成新的测试用例以覆盖原始 PR 中未包含的场景
Test Design
- 由于 Agent 可能引入超出原始 PR 的新测试用例,SWE-Bench 中使用的静态 fail2pass 脚本不再适用
- 本文指示 Agent 从头构建一个结构化的 bash 脚本,包含:
- (1)所选和合成的测试用例及正确的退出码捕获
- (2)标记测试输出开始和结束的输出分隔符,以便可靠地解析日志
- (3)嵌入在脚本输出中的一个专用退出码标记(
OPENSWE_EXIT_CODE),其值作为确定修复正确性的最终信号
Script Design
- 为了支持稳定迭代,该脚本基于模板,将补丁注入与测试命令逻辑分开,以便 Agent 可以在不重新生成整个脚本的情况下跨迭代优化测试调用
- 对于基于 conda 的环境,强制执行显式的激活序列,以防止可能静默破坏测试结果的微妙 PATH 问题
- 与 Dockerfile Agent 类似,评估脚本 Agent 在相同的迭代反馈循环中运行:
- 仓库探索 Agent 和 Dockerfile Agent 在生成之前提供仓库上下文,测试执行后,测试分析 Agent 检查测试执行的最终结果并确定修复是否正确
- 如果不正确,它将向评估脚本 Agent 提供反馈,以便为下一次迭代优化脚本
- 仓库探索 Agent 和 Dockerfile Agent 在生成之前提供仓库上下文,测试执行后,测试分析 Agent 检查测试执行的最终结果并确定修复是否正确
Environment Evaluation
- 有了 Dockerfile 和评估脚本, Pipeline 将进入基于规则的验证阶段
- 对于每次迭代,Docker 镜像被构建一次,评估脚本在两种条件下执行:
- 首先应用 test-only patch 以验证测试在 未打补丁的代码库上确实失败 ,然后应用 full fix patch 以验证所有测试通过
- 仅当两个条件都满足时,样本才被接受
- 通过正则表达式从脚本输出中解析退出码标记
OPENSWE_EXIT_CODE \\(= \mathbf{X}\\)- 如果标记缺失,验证被标记为失败,并将针对性反馈返回给 Agent
- 首先应用 test-only patch 以验证测试在 未打补丁的代码库上确实失败 ,然后应用 full fix patch 以验证所有测试通过
- 为了在大规模下支持此验证,本文引入了两项基础设施优化
- 首先,为确保结果可重现并防止并发评估间的资源争用,每个容器被绑定到 4 个专用 CPU 核心、24 GB 内存上限和 200 GB 存储限制
- 其次,不丢弃每次迭代后的镜像,而是保留镜像直到 Dockerfile 发生更改(这在仅评估脚本被修改的常见情况下实现了 \(5\times\) 的加速)
- 成功验证的镜像被推送到远程仓库,以供后续训练和评估复用
Test Analysis
- 基于规则的验证完成后,无论样本是通过还是失败,测试分析 Agent 都会检查结果
- 对于通过的结果,它会检查日志以验证成功是真实的:
- 检查评估脚本是否包含硬编码的退出码或其他绕过真实测试执行的快捷方式
- 对于失败,它会诊断根本原因:
- Dockerfile 配置错误、评估脚本错误或本质上的环境不可解(例如,冲突的依赖项、不可用的 Python 版本)
- 对于可修复的错误,它会生成有针对性的反馈,相应的 Agent 进行下一次迭代
- 对于本质上不可解的情况,它会标记样本以允许提前退出
- 对于通过的结果,它会检查日志以验证成功是真实的:
- 最终数据集仅保留那些通过了基于规则评估和 Agent 合法性检查的样本
Multi-Machine Construction
- 为了促进第 1 节中描述的大规模合成,本文部署了一个由 64 个弹性计算服务(ECS)实例组成的分布式计算集群
- 该基础设施通过跨隔离节点并行化基于 Docker 的评估 Pipeline ,能够同时处理大约 572,114 个 GitHub PR 的庞大语料库
- 使用 Deepseek-v3.2 (2025a) 作为构建模型
- 在此规模下构建环境带来了重大的工程挑战:
- Execution Instability :
- Pipeline 依赖于非确定性的外部因素,包括 LLM API 延迟、网络相关的依赖项解析以及 Agent 合成脚本的执行,所有这些都可能导致意外的进程崩溃
- Resource Contention,资源争用 :
- 标准 Docker 引擎缺乏精细的资源隔离能力,无法防止在密集构建期间发生 OOM 或磁盘饱和,这可能使宿主机节点不稳定
- Execution Instability :
- 为了解决这些问题,本文设计了一个解耦的、容错的并行化框架:
- 具有最小耦合的数据并行性(Data Parallelism with Minimal Coupling) :
- 采用了数据并行方法来最小化节点间依赖
- 与 MPI 或 Ray 等紧密耦合的框架(其中单个节点故障可能使整个作业停止)不同,本文的架构确保节点独立运行
- 基于共享文件系统的消息队列(Shared Filesystem Message Queue) :
- 通信和任务分发通过托管在共享文件系统上的基于文件的消息队列进行管理
- 这种设计将任务生产者与消费者解耦,确保单个节点故障不会导致数据丢失或系统范围瘫痪
- 弹性进程管理(Resilient Process Management) :
- 所有合成进程都通过 systemd 服务进行管理
- 此配置在意外软件终止时提供自动服务恢复和重启
- 自动资源清理(Automated Resource Pruning) :
- 为防止“僵尸”容器或孤立镜像(中断的 Agent 脚本的常见副作用)耗尽存储和内存,本文实现了一个自动清理守护进程,积极清理未使用的 Docker 资源
- 可观测性和监控(Observability and Monitoring) :
- 部署了基于 Prometheus 和 Grafana 的监控栈,以实时跟踪性能指标和任务进度,从而能够快速诊断硬件或 Pipeline 异常
- 具有最小耦合的数据并行性(Data Parallelism with Minimal Coupling) :
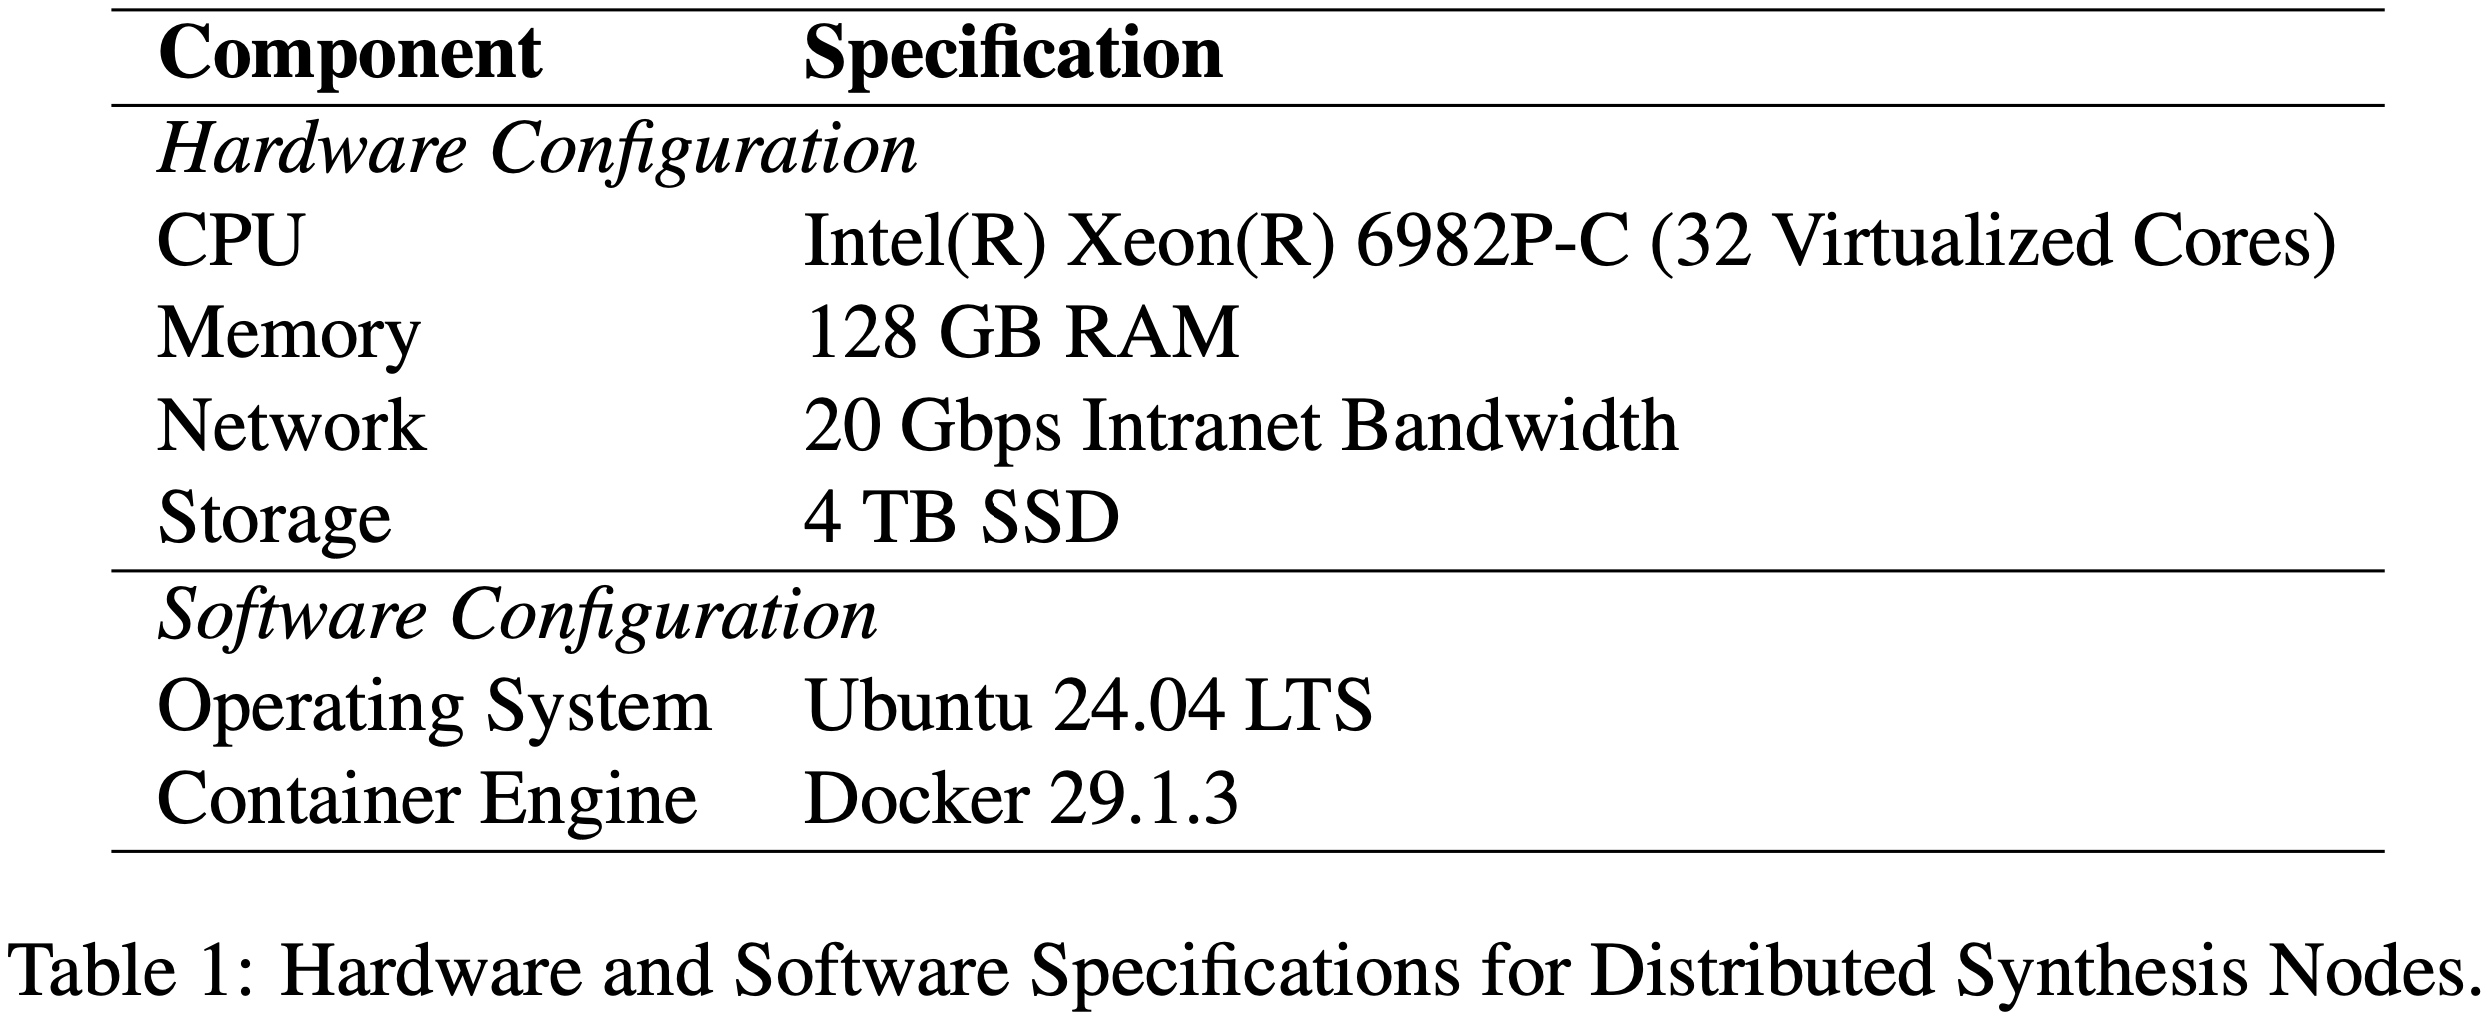
- 表 1 标准化了 64 个计算节点中每个节点的硬件和软件规格
- 通过在小规模下的经验实验,将此每节点规格确定为一个接近最优的操作点:
- 它提供了足够的每任务吞吐量,同时避免了进一步资源扩展所观察到的收益递减
- 借助这个 64 节点集群,在大约两周内完成了 45,320 个验证环境的构建,将原本可能需要数月的过程大大缩短,并使合成 Pipeline 的迭代优化变得切实可行
- 通过在小规模下的经验实验,将此每节点规格确定为一个接近最优的操作点:
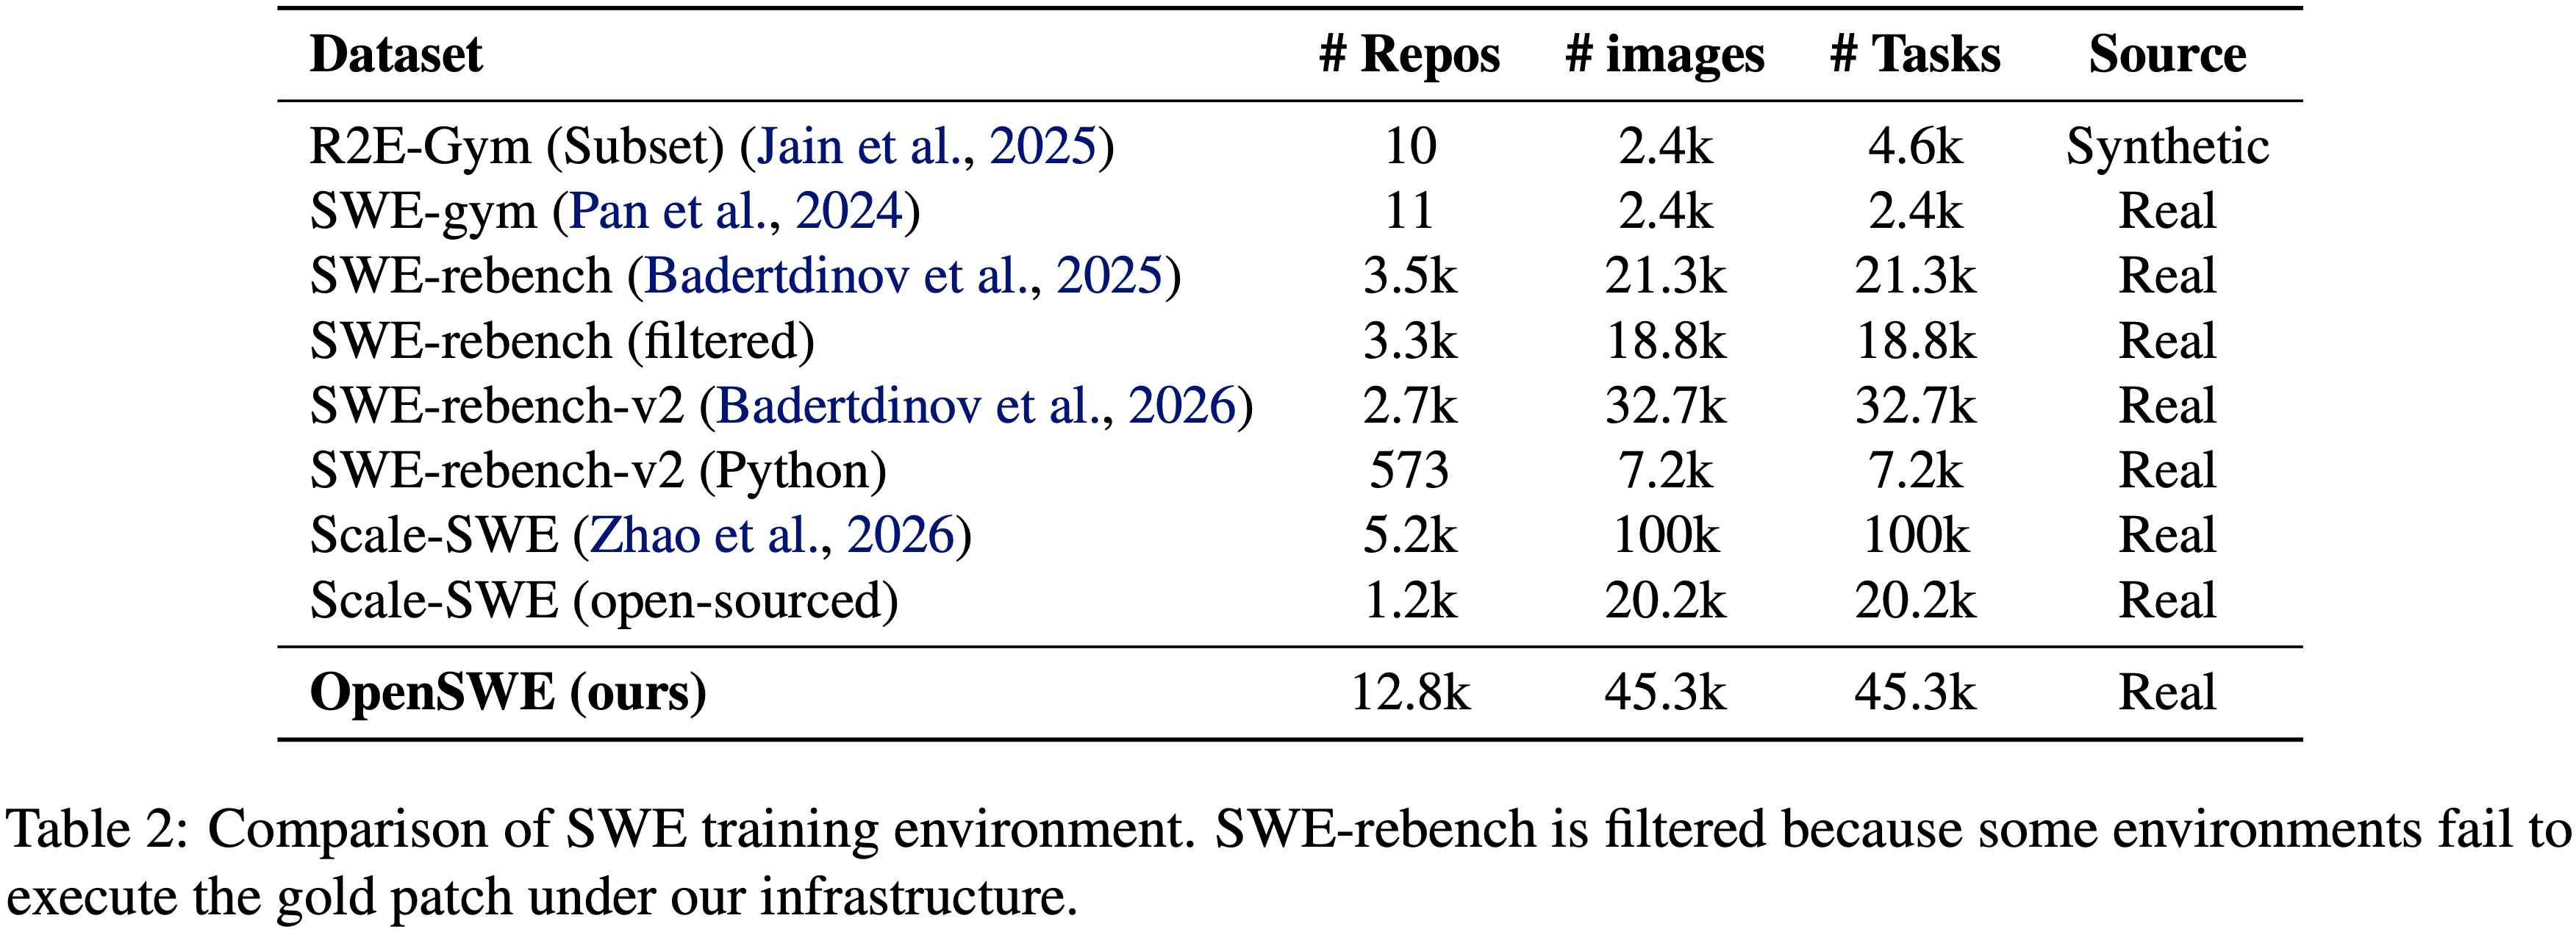
- 表 2:SWE 训练环境对比
- SWE-rebench 被过滤是因为在作者基础设施下,部分环境无法成功执行 gold patch
- SWE-rebench 被过滤是因为在作者基础设施下,部分环境无法成功执行 gold patch
Environment Statistics
- 表 2 将 OpenSWE 与现有的 SWE 训练数据集在规模和可执行性方面进行了比较
- 本文过滤了所有已在 SWE-rebench 和 SWE-Bench Verified 中创建的实例
- OpenSWE 在所有数据集中提供了最大数量的可执行仓库和任务,覆盖了 12.8k 个仓库和 45.3k 个任务
Training
Training Data Collection
- 为了构建训练数据,使用 GLM-4.7 模型 在 OpenHands 或 SWE-Agent 框架下(温度 1.0,200k 上下文,300 步)对整个 OpenSWE 和(过滤后的)SWE-rebench 数据集进行了四次轨迹采样
- 本文收集了在相同实例的四次尝试中一次或两次正确的所有轨迹
- 为确保训练质量,屏蔽了任何包含格式错误或其他错误从而导致错误观察的步骤
- 本文同时移除了 bash 动作中包含 ‘git pull’ 的所有数据,以避免 Reward Hacking 行为
SFT Training
- 本文修改了 slime 代码以支持带正确动作屏蔽的多轮训练
- 所有模型均使用最大 token 数 128k、5 个 epoch、批次大小 128 以及从 1e-5 到 1e-6 的余弦退火学习率进行训练
- 本文使用 Qwen2.5-32B-Base 和 Qwen2.5-72B-Base 作为基础模型
Experiments
Experimental Setup
- 在 SWE-Bench Verified 上使用 OpenHands 或 SWE-Agent(温度 0.7,128k 上下文,300 步)评估作者的模型,并报告 Pass@1,该指标在 2 次运行中取平均
Main Results
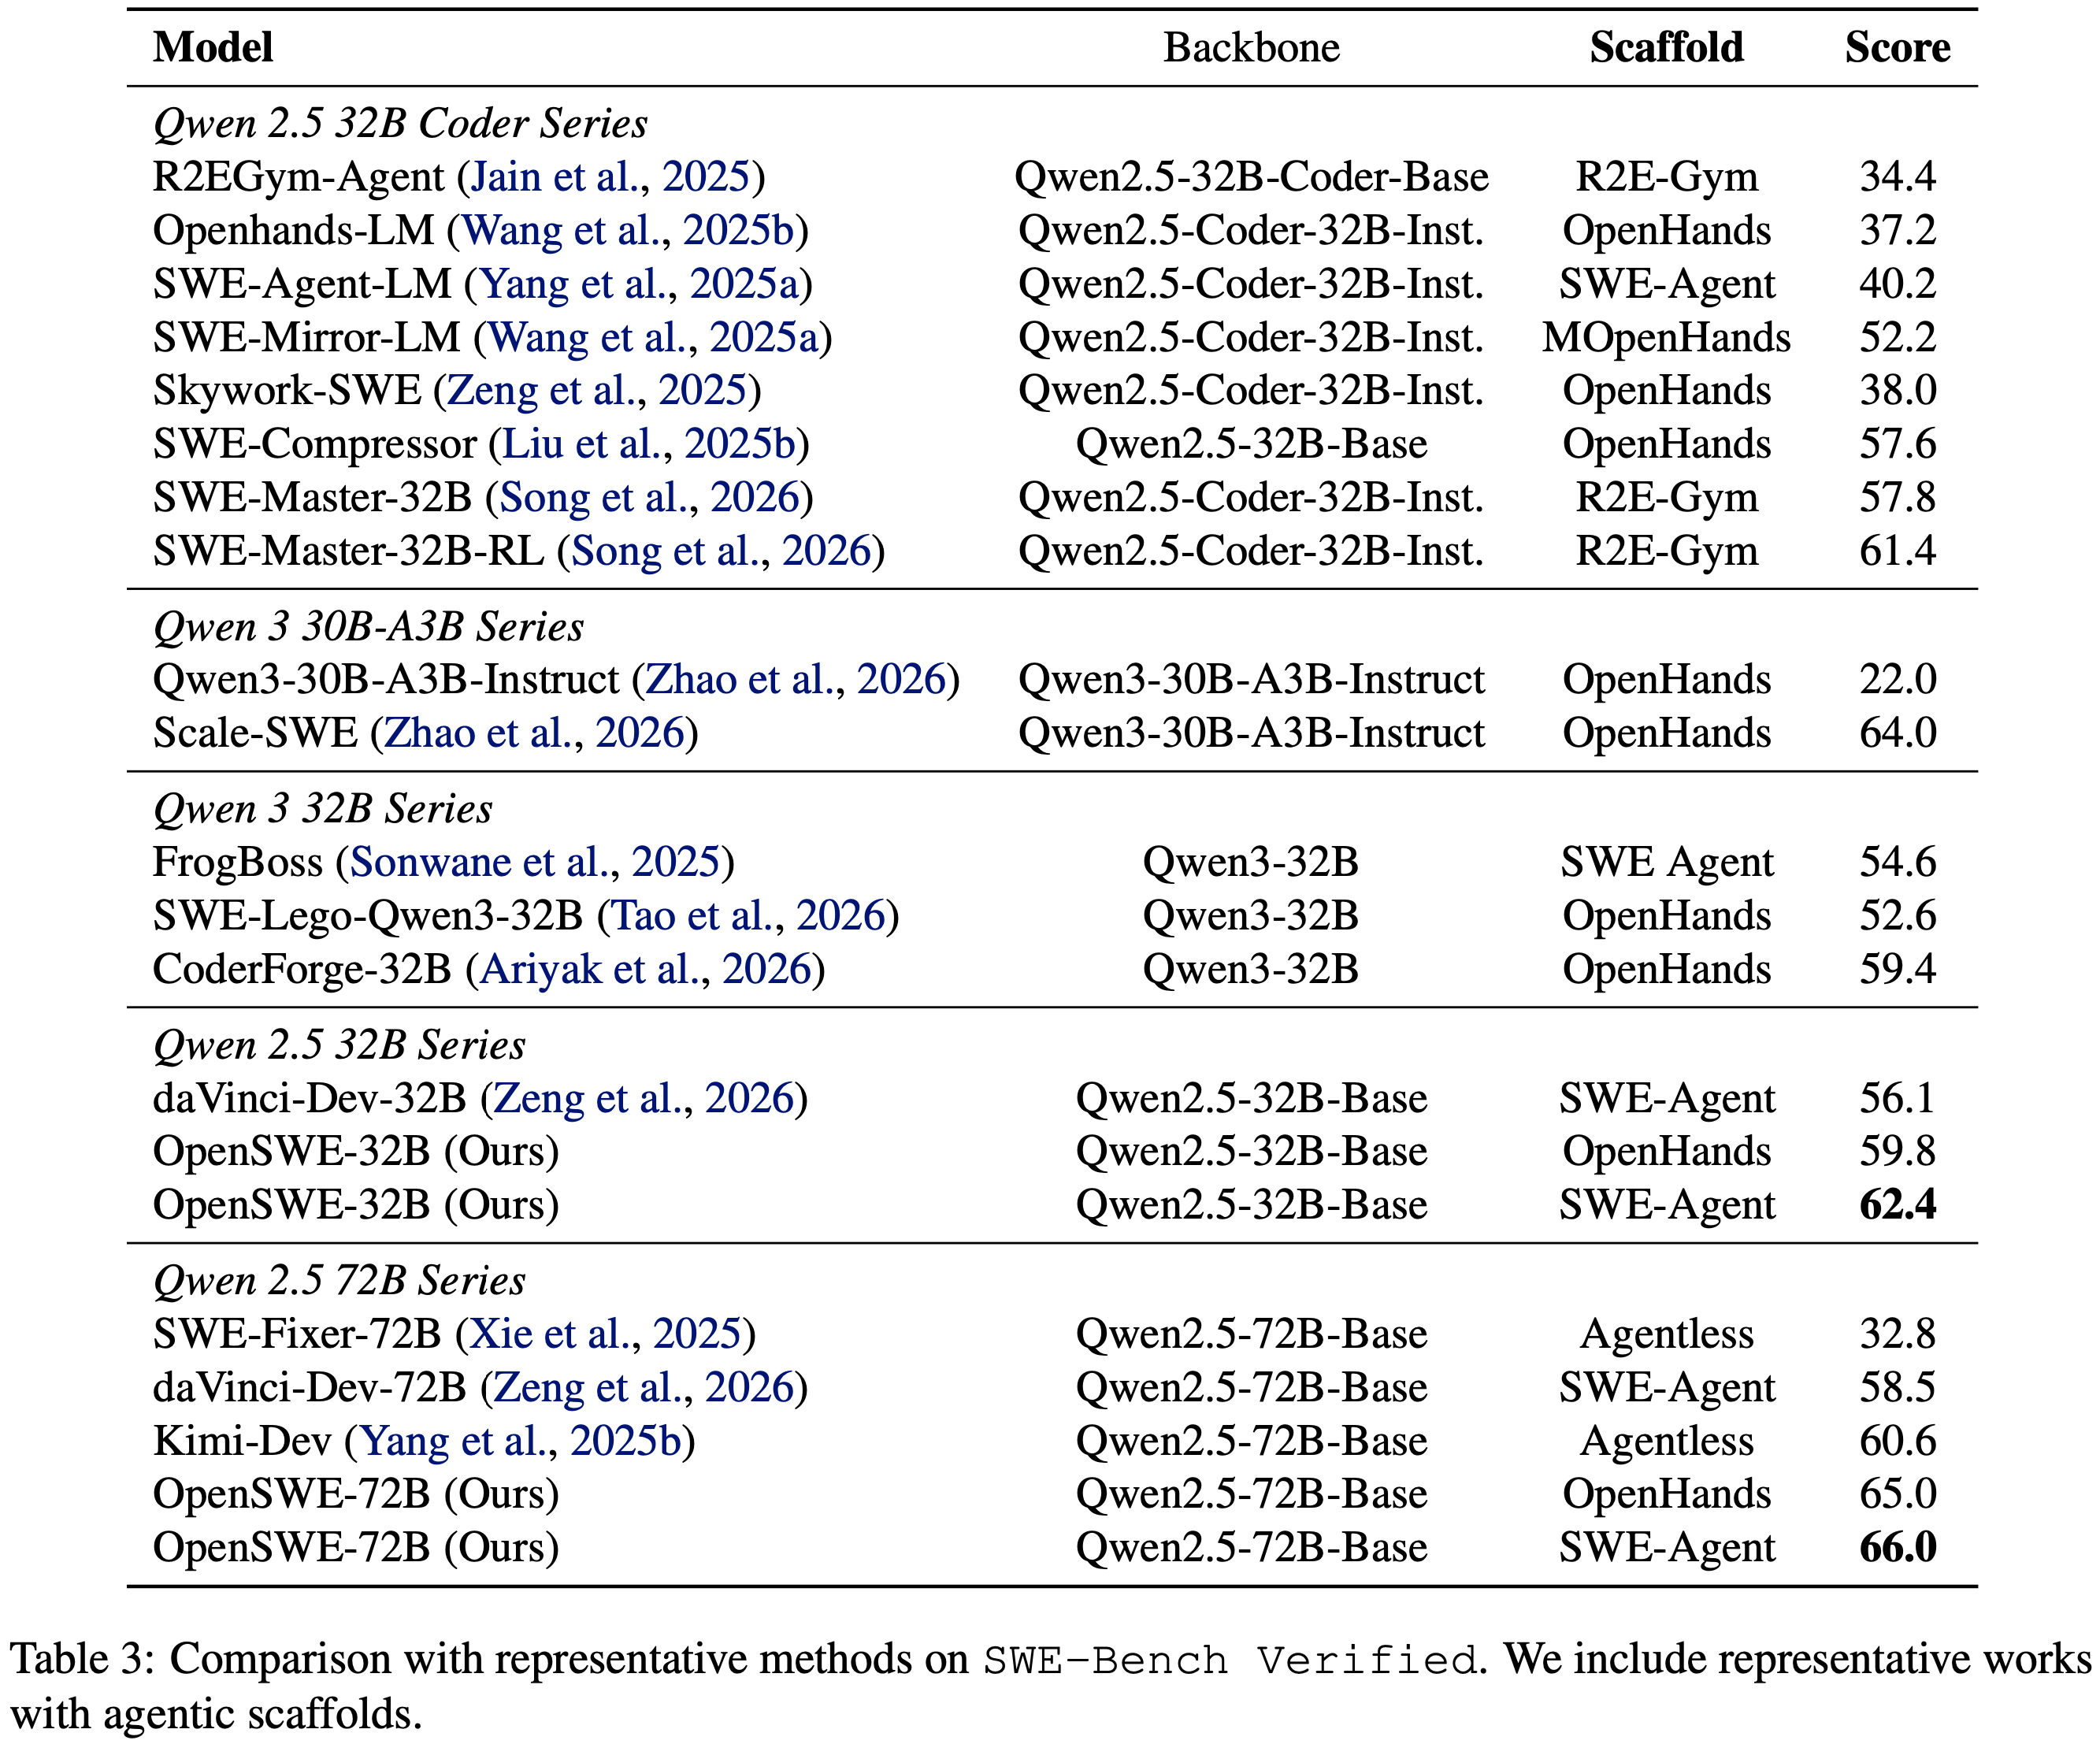
- 表 3 展示了 OpenSWE 与代表性方法在 SWE-Bench Verified 上的比较
- State-of-the-Art at Both Scales
- OpenSWE-32B 达到了 \(62.4\%\) 的解决率,超越了 Qwen2.5 系列上的所有方法
- 与最强的 Qwen2.5-Coder-32B 基线 SWE-Master-32B 和 SWE-Master32B-RL 相比,OpenSWE-32B 在使用非 Coder 基础模型的情况下提升了 \(4.6\%\),这表明高质量的环境数据可以补偿领域特定的预训练
- 在 72B 规模上,OpenSWE-72B 达到了 \(66.0\%\),比 daVinci-Dev-72B 高出 \(7.5\%\)
- 32B 和 72B 的结果均证明了 OpenSWE 的有效性
- Scaling with Model Capacity
- OpenSWE-72B 相比 OpenSWE-32B 提升了 \(3.6\%\)
- 注:对于之前的工作 daVinciDev,在相同框架下从 32B 扩展到 72B 仅带来了 \(2.4\%\) 的增益
- 这表明更高质量的培训环境使模型能够更好地利用增加的参数
- 理解:这里的表达主要是想表明,当模型参数扩大的时候,不同的框架带来的提升效率是不一样的
- OpenSWE-72B 相比 OpenSWE-32B 提升了 \(3.6\%\)
- Scaffold-Agnostic Effectiveness
- 如表 3 所示
- OpenSWE-32B 在 OpenHands 上达到 \(59.8\%\),在 SWE-Agent 上达到 \(62.4\%\)
- OpenSWE-72B 在 OpenHands 上达到 \(65.0\%\),在 SWE-Agent 上达到 \(66.0\%\)
- 这表明高质量环境数据惠及多种框架设计,而非特定于某个 Agent 框架,OpenSWE 更具备实用性
- 如表 3 所示
Data Scaling Analysis
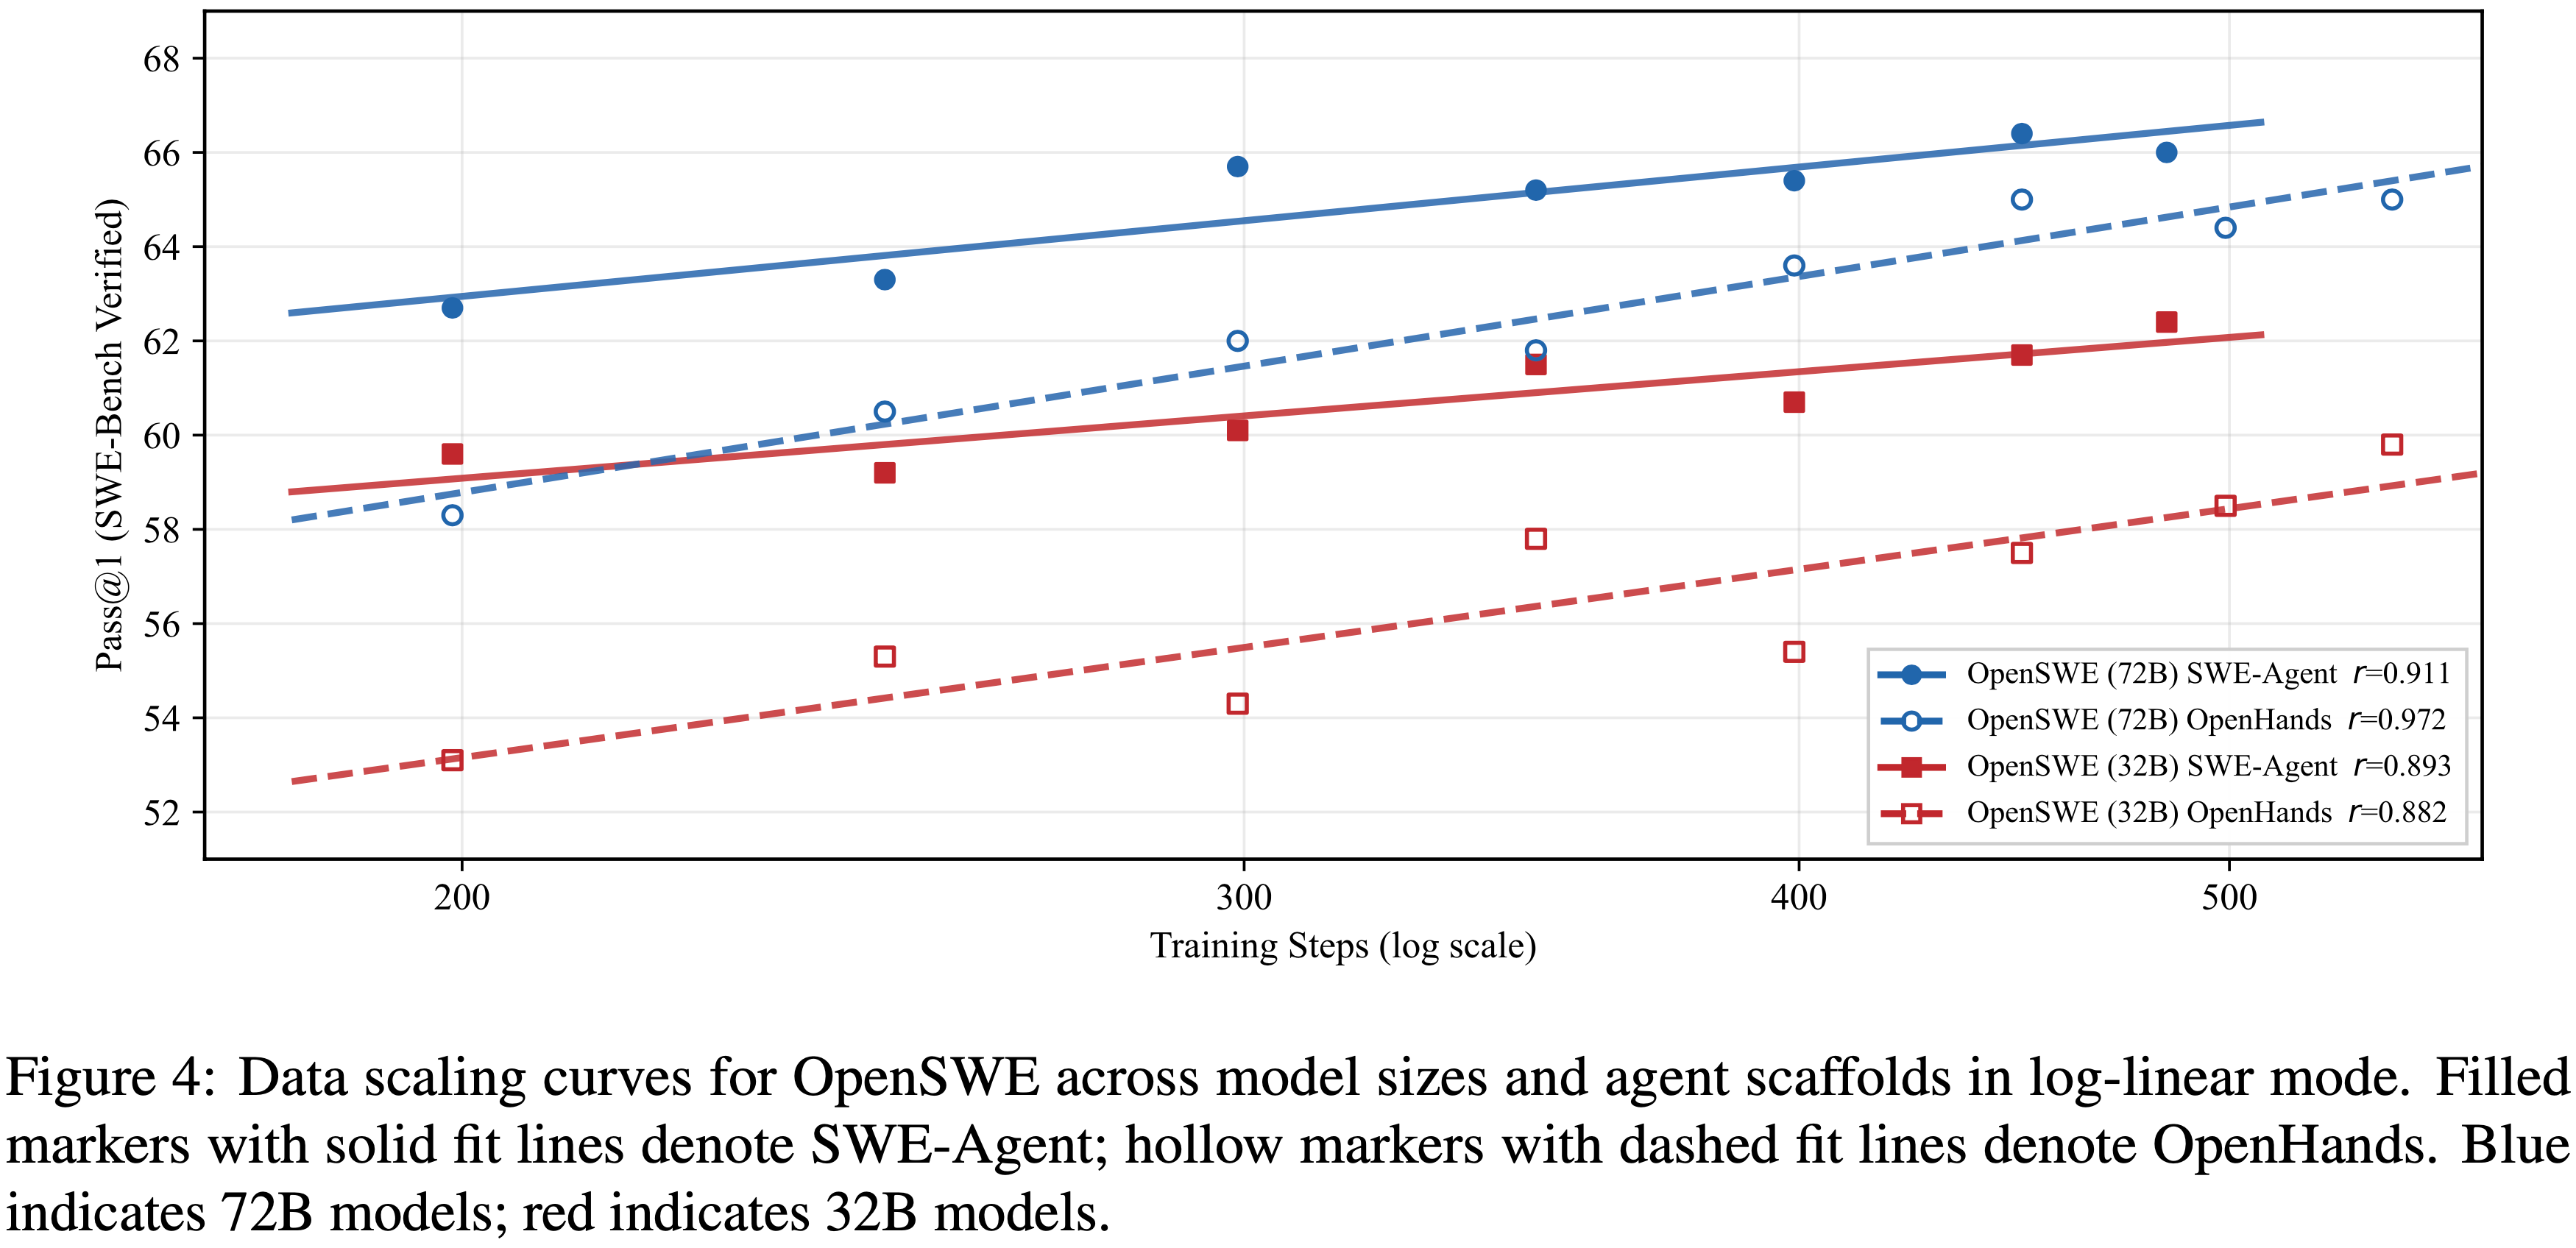
- 为了研究训练数据规模对 Agent 性能的影响,本文从完整的 OpenSWE 训练集中构建了不同大小的子集,并在两个模型规模(Qwen2.5-32B 和 Qwen2.5-72B)和两个 Agent 框架(SWE-Agent 和 OpenHands)上评估了检查点
- 注:
- CodeAct 是一种统一的行动空间设计,允许智能体将代码执行和自然语言推理交织在一起 的行动范式
- OpenHands 是基于 CodeAct 行动范式实现的一种框架
- 图 4 中写的 OpenHands 和后面聊的 CodeAct 框架对应的模型是同一个
OpenHands provides an extensible open-source platform utilizing the CodeAct framework, which allows agents to interleave code execution and natural language reasoning within a unified action space
- 注:
- 结果见图 4(图 4:OpenSWE 在不同模型规模和 Agent 框架下的数据缩放曲线(对数-线性模式))
- Log-Linear Scaling Trend
- 在四种模型-框架配置中,Pass@1 大致随训练步数呈对数-线性提升
- 本文为每条曲线在对数步长空间中拟合了一个线性模型,并观察到一致的高皮尔逊相关系数:
- 72B CodeAct 为 \(r = 0.972\)
- 72B SWE-Agent 为 \(r = 0.911\)
- 32B SWE-Agent 为 \(r = 0.893\)
- 32B CodeAct 为 \(r = 0.882\)
- 在两种模型规模和两种框架下均一致的高 \(r\) 值表明,对数-线性缩放行为是训练数据的一个稳健特性,而非特定架构或评估协议的产物
- Larger Models Benefit More from Scaling
- 72B 模型在所有训练步数上均一致地优于其 32B 对应模型
- 随着训练的进行,差距在扩大:表明更大的模型从额外的训练数据中提取了更大的收益
- 在早期检查点,72B SWE-Agent 领先 32B SWE-Agent 约 \(3.1\%\),而在 \(\sim 484\) 步时,此差距扩大到 \(3.6\%\)
- 对于 CodeAct 框架,72B 模型相对 32B 模型从第 199 步的 \(5.2\%\) 领先保持到第 544 步的 \(5.2\%\) 领先
- 理解:这里确实没涨
- Scaffold Comparison
- SWE-Agent 在两种模型规模上均持续优于 OpenHands
- 对于 72B 模型,SWE-Agent 在最终检查点达到 \(66.0\%\),而 OpenHands 为 \(65.0\%\)
- 对于 32B 模型,SWE-Agent 达到 \(62.4\%\),而 OpenHands 为 \(59.8\%\)
- 这 \(1 - 3\%\) 的差距表明 SWE-Agent 框架的设计提供了持续的优势(尽管两种框架都从数据缩放中相似地受益)
- SWE-Agent 在两种模型规模上均持续优于 OpenHands
- No Saturation Observed
- 四条曲线在作者当前的预算内均未显示饱和迹象
- 在最大训练步数下持续上升的趋势表明,进一步扩大 OpenSWE 训练集将带来额外的性能提升
Impact of Environment Source
- 为了理解环境选择如何影响下游 Agent 性能,本文在来自不同来源的环境上训练了相同的模型,并在相同协议下进行评估
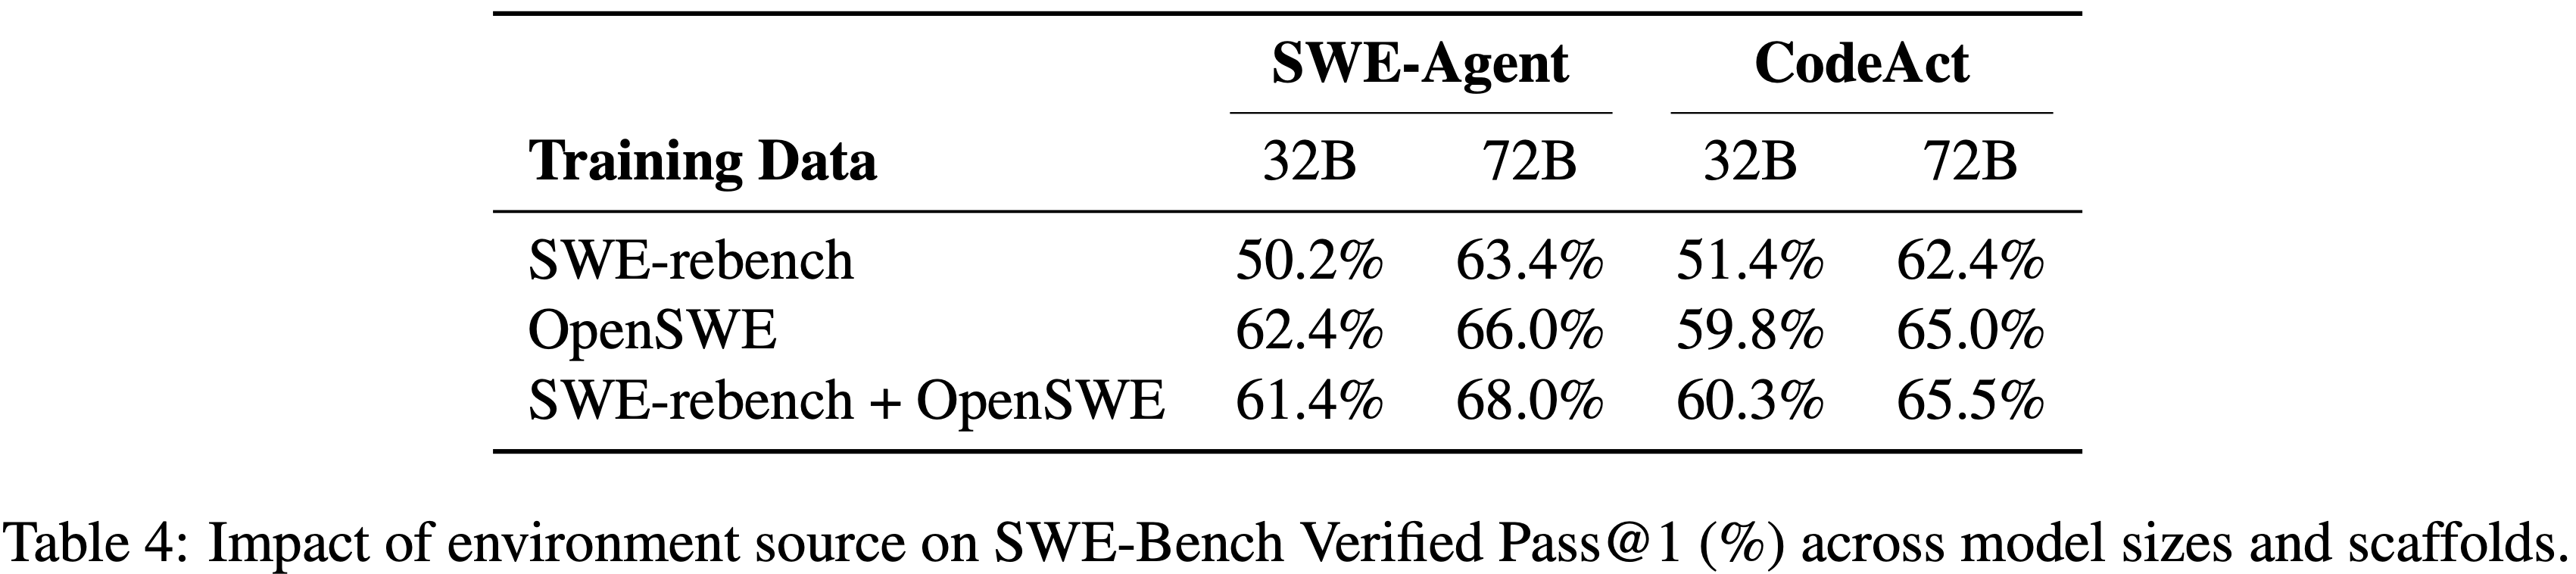
- 表 4 报告了结果
- OpenSWE 环境显著更有效(OpenSWE Environments Are Substantially More Effective)
- 单独在 OpenSWE 上训练在所有四种配置中都带来了相比 SWE-Rebench 的大幅提升
- 最显著的增益出现在 32B SWE-Agent 设置中
- OpenSWE 以 \(12.2\%\) 的绝对优势(\(62.4\%\) 对比 \(50.2\%\))超越了 SWE-Rebench
- 即使在 SWE-Rebench 最具竞争力的 72B CodeAct 配置中,OpenSWE 仍然领先 \(2.6\%\) (\(65.0\%\) 对比 \(62.4\%\))
- 最显著的增益出现在 32B SWE-Agent 设置中
- 这表明 OpenSWE 合成环境的质量和多样性提供了比 SWE-Rebench 更强的训练信号
- 单独在 OpenSWE 上训练在所有四种配置中都带来了相比 SWE-Rebench 的大幅提升
- 混合来源的互补价值(Complementary Value of Mixing Sources)
- 将 SWE-Rebench 与 OpenSWE 结合为 72B 模型带来了进一步的提升:
- 72B SWE-Agent 配置达到了 \(68.0\%\),比单独使用 OpenSWE 提高了 \(2.0\%\),这是所有设置中的最佳结果
- 这表明 SWE-Rebench 引入了对更大模型有益的互补环境模式
- 但对于 32B 模型,混合在 SWE-Agent 上略微降低了性能(\(61.4\%\) 对比 \(62.4\%\))
- 表明较小的模型可能对异构数据源引入的分布偏移更为敏感
- 注意:这里分数仅仅波动两三分,会不会是评测或者模型训练本身存在波动
- 将 SWE-Rebench 与 OpenSWE 结合为 72B 模型带来了进一步的提升:
- Robustness Across Scaffolds
- 环境来源的相对顺序在 SWE-Agent 和 CodeAct 两种框架下是一致的:
- OpenSWE 始终优于 SWE-Rebench,并且混合主要为更大的模型带来额外收益
- 这种与框架无关的模式强化了性能差异源于训练环境质量而非特定框架交互的观点
- 环境来源的相对顺序在 SWE-Agent 和 CodeAct 两种框架下是一致的:
General Capability Evaluation
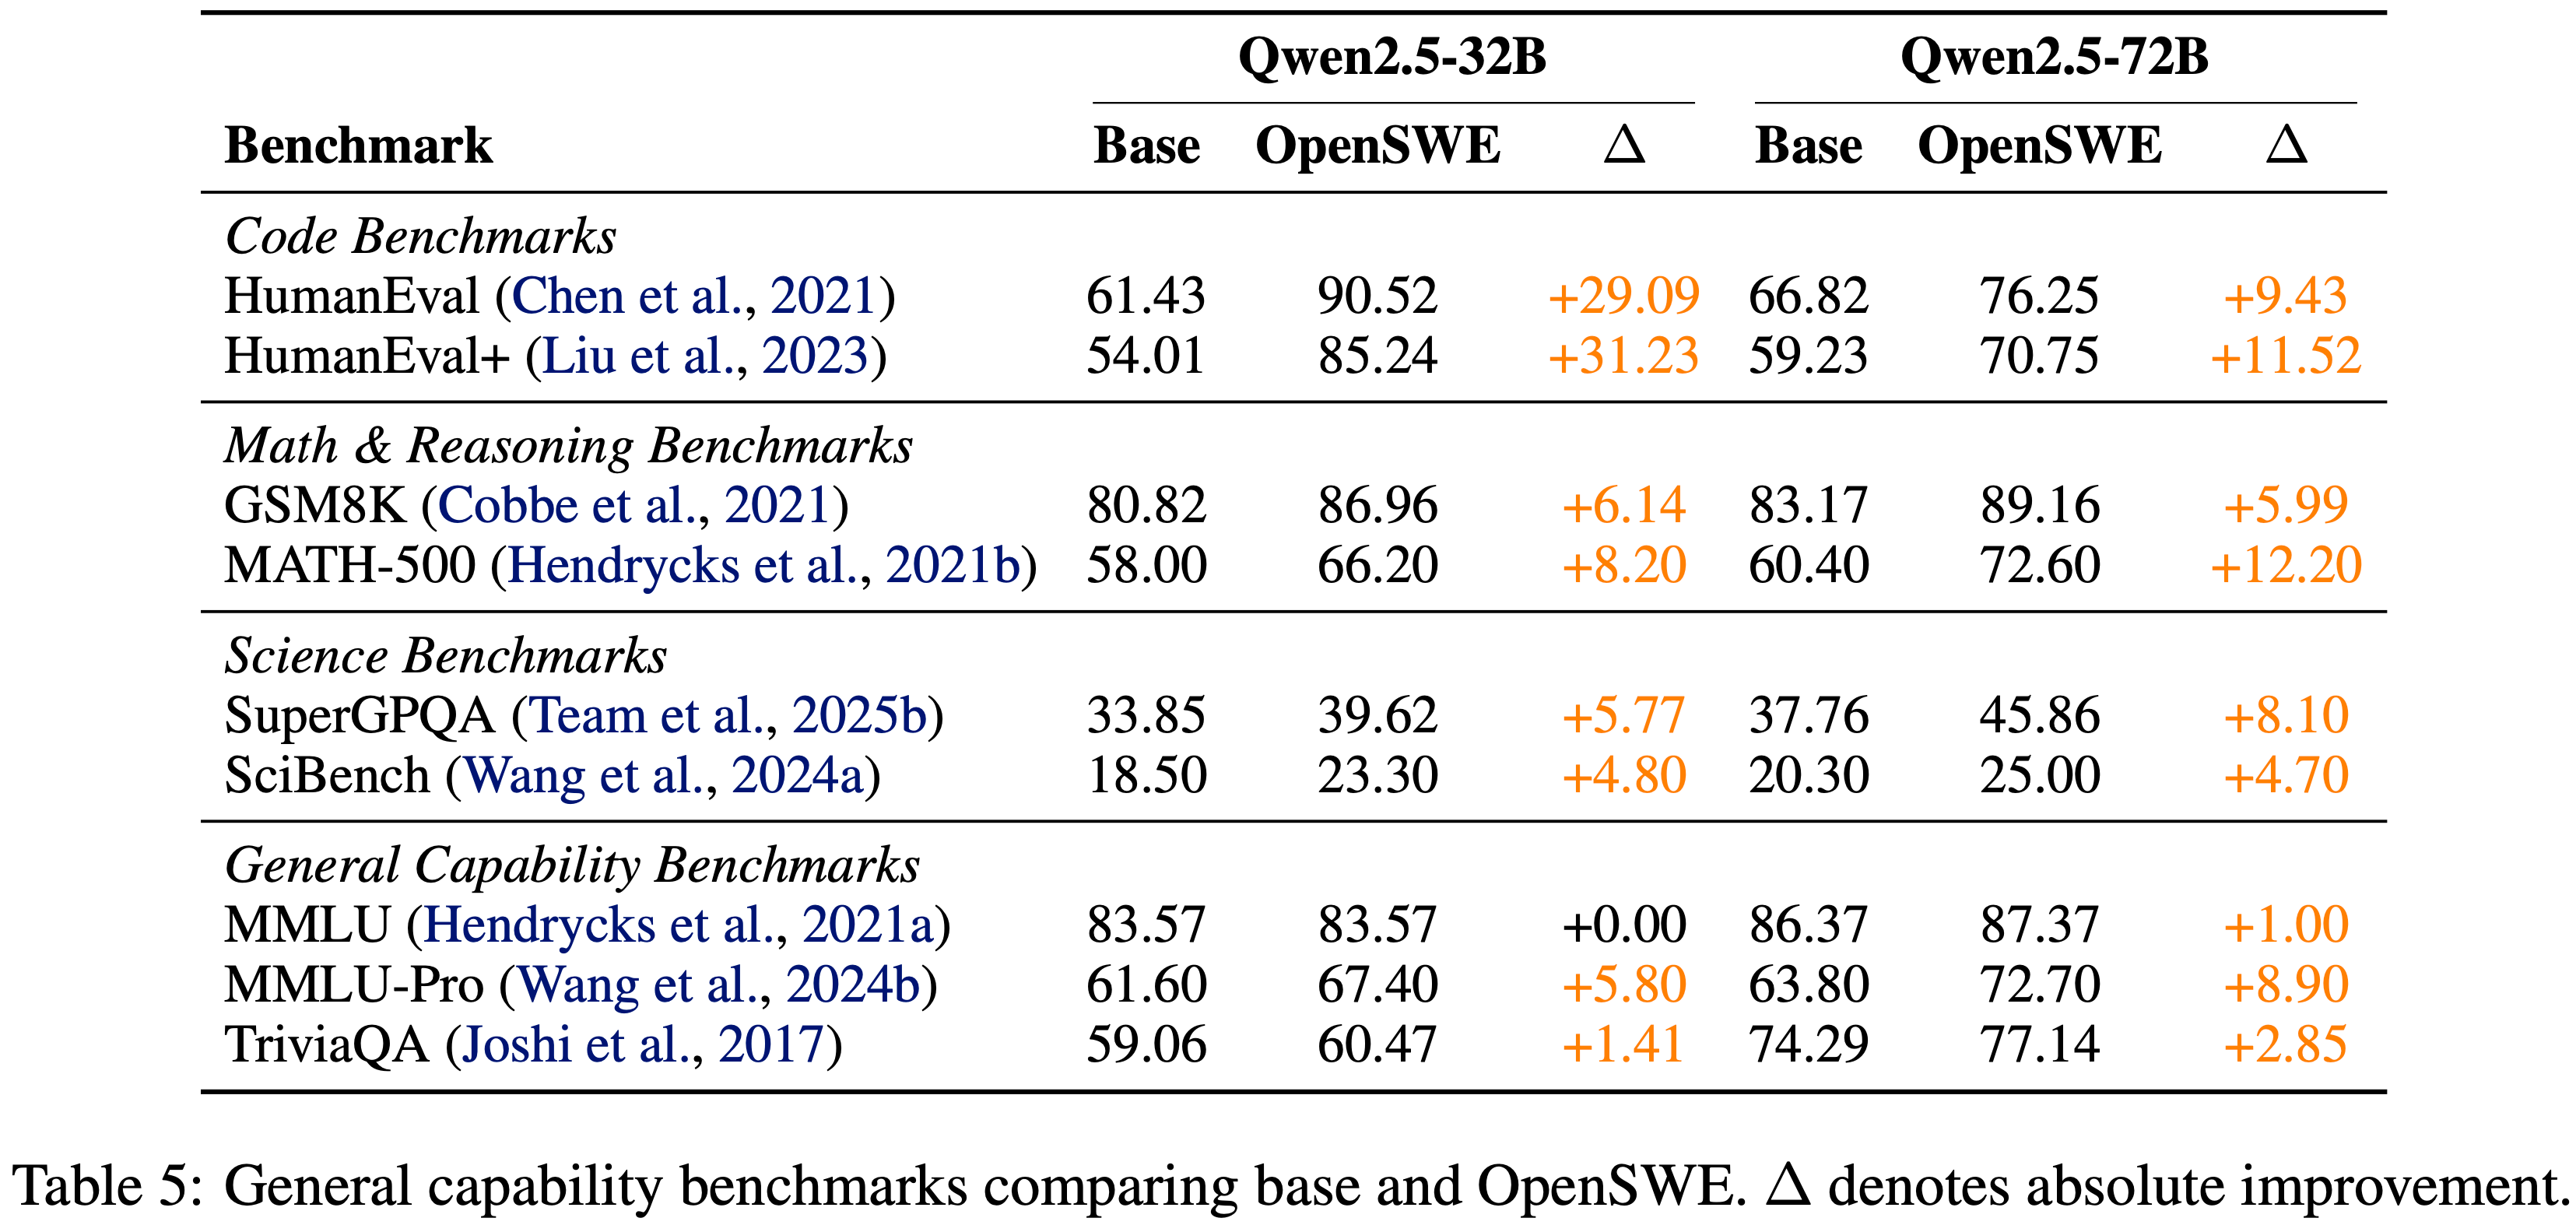
- 为评估专注于 SWE 的训练是否影响更广泛的模型能力,本文在涵盖代码生成、数学推理、科学知识和通用语言理解的一套通用基准上,将 OpenSWE 模型与其基础对应模型进行了评估
- 结果见表 5(\(\Delta\) 表示绝对提升)
- 结果见表 5(\(\Delta\) 表示绝对提升)
- 最大的增益出现在代码基准上,32B 模型在 HumanEval 和 HumanEval+ 上提升了超过 29 个点
- 因为 SWE 任务本质上需要阅读、编辑和生成代码,这种直接的技能重叠产生了最强的迁移
- 在所有三个数学基准上的一致改进表明
- SWE Debug 所培养的多步规划和逻辑分解能力可以推广到数学推理(即使没有明确的数学训练数据)
- SuperGPQA 和 SciBench 显示出中等程度的提升
- 这很可能是因为科学问题需要类似于补丁生成过程中所练习的结构化推理链,尽管领域差距限制了提升幅度
- 相比之下,MMLU 几乎保持不变,TriviaQA 仅略有提升,这证实了 SWE 训练增强了程序化问题解决能力,而不影响事实 Recall
- 事实 Recall 更多地依赖于预训练的覆盖范围而非推理能力
附录 A:SWE Environment Builder: Architecture and Prompt Excerpts
- 本节记录了负责合成可复现的基于 Docker 的评估环境的构建器子系统的设计
- Goal
- 给定一个任务实例(由一个固定基础提交处的仓库快照以及用于评估的补丁信息组成),本文的构建器会生成一个构建隔离运行时环境的 Dockerfile,以及一个运行相关测试并发出机器可读信号的 bash 评估脚本
- Iterative loop
- 构建器遵循一个迭代过程
- Step 1,通过检查仓库来执行上下文检索,以推断依赖项、Python 约束和测试入口点
- Step 2,如果可用,则合成或检索一个 Dockerfile 和一个评估脚本
- Step 3,通过构建镜像、运行评估脚本并从日志中提取结构化标记来执行和验证生成的环境
- Step 4,通过提供简要的失败诊断并重复循环来优化工件
- 构建器遵循一个迭代过程
A.1 Prompt Design
- 下面仅引用那些最直接地强制执行稳定、大规模合成所需的工程不变性的 Prompt 片段
Repo Exploration Agent
检索 Prompt 强制执行目标驱动且非穷举的策略
它不鼓励广泛的仓库爬取,而是要求一份简短的、可操作的报告,记录确切的版本和具体的测试命令
Repo exploration system prompt excerpt (verbatim)
1
2
3
4
5
6
7
8
9
10
11
12
13
14
15
16
17
18
19
20
21
22
You are a context_retrieval_agent responsible for gathering precise and necessary information from the local repository to support environment setup and test execution. After gathering the information, you will generate a concise report summarizing the key findings related to the setup and test execution.
Sometimes, another agent (such as a test analysis agent) may explicitly request specific information to help fix issues like Dockerfile errors or evaluation script failures.
Your primary goal is to:
If a specific request is provided by a calling agent, focus your retrieval narrowly on that request, extracting only the explicitly required files or data. If no explicit request is given by another agent, or if the request is incomplete or unclear, perform a basic and limited exploration of the repository to collect general environment and test execution information. Avoid exhaustive or in-depth searches. **Pay special attention to the following information when collecting and summarizing: **Exact versions of dependencies, libraries, and programming languages (e.g., flask-2.0.3, python3.9, node 18) Commands for setting up the environment and executing tests (e.g., pip install -r requirements.txt, pytest tests/test_api.py) Any environment configuration details (e.g., env files, specific OS package dependencies, etc.) Specific test commands for individual or specific test files, not just generic test execution commands.
## Suggested Retrieval Areas
Only investigate the following areas if explicitly requested by the calling agent. Focus your retrieval on the minimal set of files or configurations needed to resolve the issue efficiently and accurately.
1. Environment Setup Information - Exact dependencies and their versions: This includes dependencies listed in files like requirements.txt, pyproject.toml, etc. Ensure that the exact version for each dependency is captured. - Programming language versions: Ensure to capture version information like Python (e.g., python3.9), and others as specified in relevant configuration files (.python-version, etc.) - Environment configuration files: Collect details from .env, bashrc, or .zshrc if applicable, focusing on version-dependent environment variables and paths. - OS-specific requirements: Note any OS-dependent configurations (e.g., specific Linux package dependencies in apt or yum).
2. Test Execution Information - Precise test commands: Focus on specific commands or instructions for running individual tests or specific test files, not just commands for running all tests. Look for test commands in documentation like README.md, CONTRIBUTING.md, tests/README.md, etc. - CI/CD configurations: Look into files like .github/workflows, .ci.yml, travis.yml, or other pipeline configuration files that might include commands for running tests or specific test environments. - Test execution in context: Extract any specific instructions about running tests, such as flags for specific test cases, test suites, or environments. Also, pay attention to dependencies relevant to testing like test frameworks (e.g., pytest, JUnit, Mocha), env frameworks (e.g. poetry, uvm), and their versions.
3. Organize Results for other agents - Present findings in a structured way so they can be used to generate the Dockerfile and evaluation script accurately. The final report should: - Highlight the specific versions of dependencies, libraries, and testing tools. - Include commands for setup and testing (e.g., pip install, npm install, pytest). - Note any environment variables or configuration details relevant to the environment setup and test execution. - Provide clear, concise, and actionable information, making it easier for other agents to proceed with resolving any setup or test execution issues.
## Important Notes:
- The repository has already been cloned locally; you are working within the local repository directory.
- You are not expected to search broadly; retrieve only the files and information explicitly requested by the calling agent.
- Avoid redundant or speculative searches—be goal-driven and cost-efficient.- 中文翻译:
1
2
3
4
5
6
7
8
9
10
11
12
13
14
15
16
17
18
19
20
21
22
23
24
25
26
27
28
29
30
31
32
33
34
你是一个上下文检索智能体,负责从本地仓库中收集精确且必要的信息,以支持环境搭建和测试执行。收集信息后,你将生成一份简洁的报告,总结与搭建和测试执行相关的关键发现。
有时,另一个智能体(例如测试分析智能体)可能会明确请求特定信息,以帮助修复诸如 Dockerfile 错误或评估脚本失败等问题。
你的主要目标是:
如果调用智能体提供了具体请求,请将检索范围严格限定在该请求上,仅提取明确要求的文件或数据。如果其他智能体未给出明确请求,或者请求不完整或不清晰,则对仓库进行基础且有限的探索,以收集通用的环境和测试执行信息。避免穷举式或深度搜索。在收集和总结时,请特别注意以下信息:依赖项、库和编程语言的精确版本(例如 flask-2.0.3、python3.9、node 18);环境搭建和测试执行的命令(例如 pip install -r requirements.txt、pytest tests/test_api.py);任何环境配置细节(例如 env 文件、特定的操作系统包依赖项等);针对单个或特定测试文件的具体测试命令,而不仅仅是通用的测试执行命令。
## 建议检索区域
仅在调用智能体明确请求时,才调查以下区域。将检索集中在解决问题所必需的最少文件或配置集上,以实现高效和精确。
1. 环境搭建信息
- 精确的依赖项及其版本:包括在 requirements.txt、pyproject.toml 等文件中列出的依赖项。确保记录每个依赖项的精确版本。
- 编程语言版本:确保捕获 Python(例如 python3.9)以及相关配置文件(.python-version 等)中指定的其他版本信息。
- 环境配置文件:如果适用,收集 .env、bashrc 或 .zshrc 中的详细信息,重点关注与版本相关的环境变量和路径。
- 操作系统特定要求:注意任何与操作系统相关的配置(例如 apt 或 yum 中的特定 Linux 包依赖项)。
2. 测试执行信息
- 精确的测试命令:重点关注运行单个测试或特定测试文件的具体命令或指令,而不仅仅是运行所有测试的命令。在 README.md、CONTRIBUTING.md、tests/README.md 等文档中查找测试命令。
- CI/CD 配置:查看 .github/workflows、.ci.yml、travis.yml 或其他可能包含运行测试或特定测试环境命令的 Pipeline 配置文件。
- 上下文中的测试执行:提取有关运行测试的任何具体指令,例如针对特定测试用例、测试套件或环境的标志。同时,注意与测试相关的依赖项,如测试框架(例如 pytest、JUnit、Mocha)、环境框架(例如 poetry、uvm)及其版本。
3. 为其他智能体整理结果
- 以结构化方式呈现发现,以便用于准确生成 Dockerfile 和评估脚本。最终报告应:
- 突出显示依赖项、库和测试工具的特定版本。
- 包含搭建和测试的命令(例如 pip install、npm install、pytest)。
- 注明与环境搭建和测试执行相关的任何环境变量或配置细节。
- 提供清晰、简洁且可操作的信息,使其他智能体能够更轻松地继续解决任何搭建或测试执行问题。
## 重要说明:
- 仓库已在本地克隆;你在本地仓库目录中工作。
- 你不应进行广泛搜索;仅检索调用智能体明确要求的文件和信息。
- 避免冗余或推测性搜索——以目标为导向且注重成本效益。
- 中文翻译:
Dockerfile Agent
Dockerfile Prompt 编码了硬性约束,以防止常见的失败模式,例如选择错误的基础镜像、省略 conda 激活或在镜像构建期间意外运行测试
这些约束通过使其在生成过程中成为不可协商的条件,补充了第 3.4 节中描述的架构选择
Dockerfile init prompt excerpt (verbatim)
1
2
3
4
5
6
7
8
9
10
11
12
13
14
15
16
17
18
19
20
21
22
23
24
25
26
27
28
29
30
31
32
33
34
35
Generate a Dockerfile based on the collected environment setup information. The Dockerfile must ensure that the provided test files can be executed correctly.
## Requirements
1. Copy the repository inside the Docker container into /testbed/ and set WORKDIR to /testbed/.
2. Checkout a specific commit SHA, which will be provided by the user.
3. Set up the environment based on the information from the context retrieval agent: - Install necessary system dependencies and programming language versions. - Set up a virtual environment (testbed) if required. - Install all necessary libraries and dependencies.
4. Ensure test execution by setting up all necessary configurations.
Important Notes:
1. You are FORBIDDEN to run tests in the Dockerfile, tests will be run using eval script.
2. When building the Dockerfile, you MUST prioritize using package managers such as APT, Maven, or NPM etc to set up the environment efficiently.
3. Ensure shell compatibility by using /bin/bash as the default shell environment to avoid runtime issues.
4. Instead of using Ubuntu/Debian Docker image, You MUST directly use our provided openswe-python-version to setup python environment. It is built from <dockerfile> FROM continuumio/miniconda3:25.3.1-1 RUN sed -i 's|deb.debian.org|mirrors.cloud.aliyuncs.com|g' /etc/apt/sources.list.d/debian.sources && \ apt update && \ rm -rf /var/lib/apt/lists/* RUN conda create -n testbed python-{python_version} -y; \ echo "conda activate testbed" > "/.bashrc; \ conda activate testbed; \ pip config set global.index-url http://mirrors.cloud.aliyuncs.com/pypi/simple/; \ pip config set global.trusted-host mirrors.cloud.aliyuncs.com; </dockerfile> - It provides conda on debian 12, a python env named testbed with given version, and change mirror source. - Available python versions include 2.7 and 3.5 to 3.14. Conda does not provide other versions. Chose best fit version rather than minimal. - If a different base image is really necessary, please also change mirror to aliyun. - It use a conda environment, so all python/pip related run must run with bash -lc or . /opt/conda/etc/profile.d/conda.sh && conda activate testbed - If you are rewriting because of python version issue, you MUST NOT create new conda env; instead change base image version. - Simply ignore conda update / pip update warning, unless it is root cause of error - It is recommended to use COPY to copy local files into the Docker container, and use of well-known basic image (python, minforge), to avoid network stuff. - DO NOT run tests in the Dockerfile - Do not include commands like npm test, pytest, or mvn test, or python -m import xxx in the Dockerfile. - Tests will be executed separately, and running them during the Docker build stage is an unnecessary overhead. - You can skip tests during environment setup because this is not your job. - If there is a reference Dockerfile, use it as a guideline. - Do not use ENTRYPOINT. - When setting up dependencies for the target repository (e.g., torch 3.33), DO NOT install the package directly from external registries (e.g., PyPI, NPM, Maven Central) using commands like pip install <package> (e.g., pip install torch). Instead, you can install the repository itself in development mode (pip install -e . for Python, npm link for Node.js, or mvn install for Java) to ensure that the local repository's code is correctly referenced during execution. Why is this important? - If you modify the repository's source code but have already installed a pre-built package from the registry, your system may load the installed package instead of your local code, leading to incorrect test results and making debugging difficult - Using development mode installation (pip install -e ., npm link, mvn install) ensures that the system always references the latest local repository code, preventing version mismatches and ensuring that modifications are properly reflected in subsequent tests.
## Example Format
The Dockerfile must be wrapped in <dockerfile> tags. Example:
<dockerfile>
# Base image specification. Defines the foundation OS and python version for the container (Required)
FROM openswe-python-3.12
# Fetch source code. Same as git clone ({task.repo_name}) && git reset --hard ({task.commit}) but avoid network stuff; guarantee to ready
COPY repo /testbed
# set default workdir to testbed. (Required)
WORKDIR /testbed/
# The lines above should NEVER change (except python version), so as to reuse layers.
# Install package and environment manager required by the repo. (Example)
ENV DEBIAN_FRONTEND=noninteractive
RUN apt install -qq -y g++
# Target Project setup. Configures it, and installs project-specific dependencies (Example)
# Note for conda, '-lc' is required for env activate; multicommand can split by ';'
RUN bash -lc 'pip install -r requirements.txt' # install requirements from context
RUN bash -lc 'pip install -e .' # install self; important for running test
RUN bash -lc 'pip install pytest "poetry>=1,<2"' # special char need quote
</dockerfile>- 中文翻译:
1
2
3
4
5
6
7
8
9
10
11
12
13
14
15
16
17
18
19
20
21
22
23
24
25
26
27
28
29
30
31
32
33
34
35
36
37
38
39
40
41
42
43
44
45
46
47
48
49
50
51
52
53
54
55
56
57
58
59
60
61
62
63
64
65
根据收集到的环境搭建信息生成一个 Dockerfile。该 Dockerfile 必须确保所提供的测试文件能够正确执行。
## 要求
1. 将仓库复制到 Docker 容器内的 /testbed/ 中,并将 WORKDIR 设置为 /testbed/。
2. 检出一个特定的提交 SHA,该 SHA 将由用户提供。
3. 根据上下文检索智能体的信息设置环境:
- 安装必要的系统依赖项和编程语言版本。
- 如果需要,设置虚拟环境(testbed)。
- 安装所有必要的库和依赖项。
4. 通过设置所有必要的配置来确保测试执行。
重要说明:
1. 禁止在 Dockerfile 中运行测试,测试将使用评估脚本运行。
2. 构建 Dockerfile 时,必须优先使用 APT、Maven 或 NPM 等包管理器来高效地设置环境。
3. 确保 shell 兼容性,使用 /bin/bash 作为默认 shell 环境,以避免运行时问题。
4. 不要使用 Ubuntu/Debian Docker 镜像,你必须直接使用我们提供的 openswe-python-version 来设置 Python 环境。它基于以下内容构建:
<dockerfile>
FROM continuumio/miniconda3:25.3.1-1
RUN sed -i 's|deb.debian.org|mirrors.cloud.aliyuncs.com|g' /etc/apt/sources.list.d/debian.sources && \
apt update && \
rm -rf /var/lib/apt/lists/*
RUN conda create -n testbed python-{python_version} -y; \
echo "conda activate testbed" > "/.bashrc"; \
conda activate testbed; \
pip config set global.index-url http://mirrors.cloud.aliyuncs.com/pypi/simple/; \
pip config set global.trusted-host mirrors.cloud.aliyuncs.com;
</dockerfile>
- 它提供 Debian 12 上的 conda、一个名为 testbed 且具有给定版本的 Python 环境,并更改了镜像源。
- 可用的 Python 版本包括 2.7 和 3.5 至 3.14。Conda 不提供其他版本。选择最合适的版本,而非最低版本。
- 如果确实需要使用不同的基础镜像,也请将镜像更改为阿里云。
- 它使用 conda 环境,因此所有与 python/pip 相关的运行都必须使用 bash -lc 或 . /opt/conda/etc/profile.d/conda.sh && conda activate testbed 执行。
- 如果是因为 Python 版本问题而重写,则不得创建新的 conda 环境;而应更改基础镜像版本。
- 直接忽略 conda update / pip update 警告,除非它是错误的根本原因。
- 建议使用 COPY 将本地文件复制到 Docker 容器中,并使用知名的基础镜像(python、minforge)以避免网络问题。
- 不要在 Dockerfile 中运行测试。
- 不要在 Dockerfile 中包含 npm test、pytest、mvn test 或 python -m import xxx 等命令。
- 测试将单独执行,在 Docker 构建阶段运行它们是不必要的开销。
- 你可以跳过环境搭建过程中的测试,因为这不是你的任务。
- 如果有参考 Dockerfile,请将其用作指南。
- 不要使用 ENTRYPOINT。
- 在为目标仓库(例如 torch 3.33)设置依赖项时,不要使用 pip install <package>(例如 pip install torch)等命令直接从外部注册表(例如 PyPI、NPM、Maven Central)安装包。相反,你可以以开发模式安装仓库本身(对于 Python 使用 pip install -e .,对于 Node.js 使用 npm link,对于 Java 使用 mvn install),以确保在执行期间正确引用本地仓库的代码。为什么这很重要?
- 如果你修改了仓库的源代码,但已经安装了来自注册表的预构建包,则你的系统可能会加载已安装的包而不是本地代码,从而导致错误的测试结果并使调试变得困难。
- 使用开发模式安装(pip install -e .、npm link、mvn install)可确保系统始终引用最新的本地仓库代码,防止版本不匹配,并确保修改在后续测试中得到正确反映。
## 示例格式
Dockerfile 必须包裹在 <dockerfile> 标签中。示例:
<dockerfile>
# 基础镜像规范。为容器定义基础操作系统和 Python 版本(必需)
FROM openswe-python-3.12
# 获取源代码。等同于 git clone ({task.repo_name}) && git reset --hard ({task.commit}),但避免网络问题;确保就绪
COPY repo /testbed
# 将默认工作目录设置为 testbed。(必需)
WORKDIR /testbed/
# 上述行应永不更改(Python 版本除外),以便重用层。
# 安装仓库所需的包和环境管理器。(示例)
ENV DEBIAN_FRONTEND=noninteractive
RUN apt install -qq -y g++
# 目标项目设置。配置它并安装项目特定的依赖项(示例)
# 注意对于 conda,环境激活需要 '-lc';多命令可用 ';' 分隔
RUN bash -lc 'pip install -r requirements.txt' # 从上下文安装要求
RUN bash -lc 'pip install -e .' # 安装自身;对运行测试很重要
RUN bash -lc 'pip install pytest "poetry>=1,<2"' # 特殊字符需要引号
</dockerfile>
- 中文翻译:
Write Evaluation Script Agent
评估脚本 Prompt 强制执行一个确定性的、对评判器友好的接口
它要求通过 heredoc 占位符进行非交互式补丁应用,并强制要求测试执行发出机器可读的标记以支持基于规则的提取
eval-script init prompt excerpt (verbatim)
1
2
3
4
5
6
7
8
9
10
11
12
13
14
15
16
17
18
19
20
21
22
23
24
25
26
27
28
29
30
31
32
33
34
35
36
37
38
39
40
41
42
43
44
45
46
47
48
Generate an evaluation script based on the collected environment setup and test execution information. The script must execute the provided test files inside the specified Docker environment.
## Requirements:
1. Activate the environment: Ensure the correct environment (e.g., Conda, venv) is activated before running the tests.
2. Apply the patch: The patch may need to be applied before running the tests.
3. Execute the given test files and unittests using the correct command found by the context retrieval agent.
## Important Notes:
1. You must execute only the specified target test files and unittests rather than running all tests in the repository. Running all tests can be highly time-consuming and unnecessary. Ensure that only the required test files are executed. You may refer to golden patch, but please remain some already passed tests other than fixed in golden patch.
2. Optimize execution efficiency by combining multiple test commands into a single command whenever possible. Avoid running multiple separate test commands if they can be executed in one batch. This reduces redundant initialization overhead and speeds up execution.
3. Ensure that the output of the evaluation script is concise and structured making it easier for the test log analysis agent to process. The test command must output the names and pass/fail/skip status of each target executed test file. Avoid excessive debug information or unrelated output in eval script, but do not suppress key test execution details. Avoid running all tests! Just run the target unittests fixed by gold patch.
4. Follow the structure of the reference evaluation script or eval script skeleton whenever available. Use a simple, minimalistic structure similar to the reference eval script to ensure clarity and maintainability. The script should be easy to modify and extend without unnecessary complexity.
5. The actual test patch content is omitted here for brevity (marked with [CONTENT OF TEST PATCH] placeholder). You must generate the complete git apply command structure, including the heredoc syntax with delimiter (EOF_114329324912). The placeholder will be programmatically replaced with the actual patch content during script execution. Example structure: git apply -v - <<'EOF_114329324912' [CONTENT OF TEST PATCH]\nEOF_114329324912
6. You MUST capture the exit code immediately after running the tests using rc=$?, and then echo: OPENSWE_EXIT_CODE=$rc. This ensures the judge can determine whether the tests passed successfully. Also, you MUST NOT include set -e, which will truncate out error code.
7. You MUST print **** Start Test Output exactly before test (pytest for example), and **** End Test Output after it, we will extract output with it after run.
## Example Format
The script must be wrapped in <script> tags. Example:
<script>
#!/bin/bash
# activate environment
. /opt/conda/etc/profile.d/conda.sh
conda activate testbed
# already created by base image
cd /testbed
# Required: apply test patch to update target tests
git apply -v --allow-empty - <<'EOF_114329324912'
[CONTENT OF TEST PATCH]
EOF_114329324912
# Required: run target tests files instead of all tests!
echo "**** Start Test Output"
pytest --no-header -rA --tb=no -p=no:cacheprovider -n4 mypy/test/testcheck.py::TypeCheckSuite::check-functions.test
mypy/test/testcheck.py::TypeCheckSuite::check-redefine.test
rc=$? # Required, save exit code
echo "**** End Test Output"
echo "OPENSWE_EXIT_CODE=$rc" #Required, echo test status
</script>- 中文翻译
1
2
3
4
5
6
7
8
9
10
11
12
13
14
15
16
17
18
19
20
21
22
23
24
25
26
27
28
29
30
31
32
33
34
35
36
37
38
39
40
41
42
43
44
45
46
47
48
49
50
51
根据收集到的环境搭建和测试执行信息生成一个评估脚本。该脚本必须在指定的 Docker 环境中执行所提供的测试文件。
## 要求:
1. 激活环境:在运行测试之前,确保正确的环境(例如 Conda、venv)已被激活。
2. 应用补丁:在运行测试之前,可能需要应用补丁。
3. 使用上下文检索智能体找到的正确命令执行给定的测试文件和单元测试。
## 重要说明:
1. 你必须仅执行指定的目标测试文件和单元测试,而不是运行仓库中的所有测试。运行所有测试可能非常耗时且不必要。确保仅执行所需的测试文件。你可以参考黄金补丁,但请保留除黄金补丁修复之外的一些已通过测试。
2. 尽可能通过将多个测试命令合并为单个命令来优化执行效率。如果多个测试命令可以批量执行,则避免分别运行它们。这可以减少冗余的初始化开销并加快执行速度。
3. 确保评估脚本的输出简洁且结构化,以便测试日志分析智能体更容易处理。测试命令必须输出每个执行的目标测试文件的名称和通过/失败/跳过状态。避免在评估脚本中输出过多的调试信息或不相关的输出,但不要抑制关键的测试执行细节。避免运行所有测试!仅运行黄金补丁修复的目标单元测试。
4. 尽可能遵循参考评估脚本或评估脚本骨架的结构。使用类似于参考评估脚本的简单、最小化结构,以确保清晰性和可维护性。脚本应易于修改和扩展,而不会引入不必要的复杂性。
5. 实际的测试补丁内容在此处省略(用 [CONTENT OF TEST PATCH] 占位符标记)。你必须生成完整的 git apply 命令结构,包括带有分隔符(EOF_114329324912)的 heredoc 语法。占位符将在脚本执行期间被程序化替换为实际的补丁内容。示例结构:
git apply -v - <<'EOF_114329324912'
[CONTENT OF TEST PATCH]
EOF_114329324912
6. 你必须在运行测试后立即使用 rc=$? 捕获退出码,然后回显:OPENSWE_EXIT_CODE=$rc。这确保评判程序能够确定测试是否成功通过。同时,你不得包含 set -e,因为它会截断错误码。
7. 你必须在测试(例如 pytest)之前精确打印 "**** Start Test Output",并在测试之后打印 "**** End Test Output",我们将在运行后使用它来提取输出。
## 示例格式
脚本必须包裹在 <script> 标签中。示例:
<script>
#!/bin/bash
# 激活环境
. /opt/conda/etc/profile.d/conda.sh
conda activate testbed
# 已由基础镜像创建
cd /testbed
# 必需:应用测试补丁以更新目标测试
git apply -v --allow-empty - <<'EOF_114329324912'
[CONTENT OF TEST PATCH]
EOF_114329324912
# 必需:运行目标测试文件而不是所有测试!
echo "**** Start Test Output"
pytest --no-header -rA --tb=no -p=no:cacheprovider -n4 mypy/test/testcheck.py::TypeCheckSuite::check-functions.test
mypy/test/testcheck.py::TypeCheckSuite::check-redefine.test
rc=$? # 必需,保存退出码
echo "**** End Test Output"
echo "OPENSWE_EXIT_CODE=$rc" # 必需,回显测试状态
</script>
- 中文翻译
Test Analysis Agent
分析 Prompt 将冗长的日志转化为可操作的迭代信号,通过强制执行基于规则的合法性标准,即仅测试运行必须失败,而包含修复的运行必须通过
它还指定了显式的路由:当失败归因于 Dockerfile 而非评估脚本时,反馈将直接发送给相应的编写 Agent
Test analysis prompt excerpt (verbatim)
1
2
3
4
5
6
7
8
9
10
11
12
13
14
15
16
17
18
19
20
21
22
23
24
25
26
27
28
29
30
31
32
33
34
35
36
37
38
39
40
41
42
43
44
45
46
47
48
49
50
51
52
Given the test log and the target tests, analyze the results and determine the next steps. But if the dockerfile is not built successfully, you should analyze what issues happen.
### Step 1: Verify Test Execution
Identify which test files were added or modified by the eval script.
- Confirm that those tests were actually executed (they appear in the test log).
- Check their return code:
- Return code for testOnly MUST BE non-0 and for testWithFix MUST BE 0.
- Check their pass/fail status.
- If all tests switch from fail to pass, report success.
- If there exists fail to fail or pass to fail, report fail. (MUST fix by write eval agent)
- If there exists pass to pass, and every other thing is correct, you may report success.
- Ensure there is at least some test output in the log.
- If no test output is found, set is_finish = false and include an instruction for write_eval_script_agent to revise the eval script so that tests actually run.
### Step 2: Identify Problems
If the tests failed due to environment setup issues, analyze whether the problem comes from:
- The Dockerfile (e.g., incorrect dependencies, wrong OS, missing configurations).
- The evaluation script (e.g., incorrect test commands, wrong paths, missing environment activation, mismatch with unit tests solved by the gold patch).
- Simply ignore conda update / pip update warning, unless it is root cause of error.
- Sometimes, tests may fail due to incorrect versions of specific dependencies. Be sure to check the versions of critical dependencies to ensure compatibility.
- If there are missing dependencies or unknown errors, consider whether additional context retrieval is required.
- Tests should not be run in the Dockerfile; skip tests during environment setup and run them in the evaluation script.
- Note that the eval script MUST catch exit code after running tests, and echo "OPENSWE_EXIT_CODE=$rc". This is important for judge whether tests are run successfully.
### Step 3: Plan Corrective Actions
If a fix is needed in the Dockerfile, provide guidance to write_dockerfile_agent on how to fix it, always include the original error message and a brief description of what is missing or suspected to be the cause. If a fix is needed in the evaluation script, provide guidance to write_eval_script_agent on how to fix it, always include the original error message and a brief description of what is missing or suspected to be the cause. If more information from the target repository is needed, provide guidance to context_retrieval_agent on what to collect. Here are some instructions:
1. Always include the original error message and a brief description of what is missing or suspected to be the cause.
2. Clearly specify what information or files should be searched for. For environment or dependency issues, recommend files such as requirements.txt, environment.yml, Dockerfile, setup.py, pyproject.toml, etc. For test or evaluation issues, suggest looking for files such as eval.sh, pytest.ini, .github/workflows/, etc.
3. Additionally, encourage reviewing documentation files like README.md, CONTRIBUTING.md, or any docs in the root or docs/ directory for relevant setup or testing instructions (Contributing file often contains some testing instruction).
4. Always add guidance to at least one of dockerfile agent or eval script agent if you guide to context retrieval agent, otherwise nothing is rewritten and error will replay.
- If you encounter network issue, simply put all guidance empty and set is_finish to false; we will rerun it.
- If you think the issue is unsolvable, you may simply set is_finish to true, sparing effort; for example:
1. Golden patch does not solve any unittest.
2. Dependency of project has unsolvable conflicts.
3. Some dependency have become missing, like 404 file, super old versions (numpy < 1.8)....
### Output Example
Provide your answer in JSON format:
json
{
"is_finish": true/false, # If tests passed and everything is correct or the issue is considered unsolvable, set this to true.
"guidance_for_write_dockerfile_agent": "Provide detailed guidance if modifications are needed",
"guidance_for_write_eval_script_agent": "Provide detailed guidance if modifications are needed",
"guidance_for_context_retrieval_agent": "Specify what additional information from the target repository is needed, if any",
}
Important Notes:
- If is_finish is true, all guidance fields can be empty.
- Be specific in your guidance, providing detailed steps for the necessary fixes. Only provide guidance to the relevant agent based on the actual issue.
- For any agent not called, its guidance field must be empty.
- Calling context_retrieval_agent is expensive. Only suggest using it when there is clearly missing information that is necessary to fix the Dockerfile or evaluation script. Be precise and specific in what to retrieve (e.g., particular files or configuration scripts) to avoid repeated or vague searches. Provide detailed error information to tell agent what errors happen.- 中文翻译:
1
2
3
4
5
6
7
8
9
10
11
12
13
14
15
16
17
18
19
20
21
22
23
24
25
26
27
28
29
30
31
32
33
34
35
36
37
38
39
40
41
42
43
44
45
46
47
48
49
50
51
52
给定测试日志和目标测试,分析结果并确定后续步骤。但如果 Dockerfile 未成功构建,你应分析发生了什么问题。
### 步骤 1:验证测试执行
识别评估脚本添加或修改了哪些测试文件。
- 确认这些测试确实被执行(它们出现在测试日志中)。
- 检查它们的返回码:
- testOnly 的返回码必须为非 0,testWithFix 的返回码必须为 0。
- 检查它们的通过/失败状态。
- 如果所有测试从失败变为通过,则报告成功。
- 如果存在从失败到失败或从通过到失败的情况,则报告失败。(必须由编写评估智能体修复)
- 如果存在从通过到通过的情况,并且其他所有内容都正确,你可以报告成功。
- 确保日志中至少有一些测试输出。
- 如果未找到测试输出,则将 is_finish 设置为 false,并向 write_eval_script_agent 包含一条指令,以修改评估脚本,使测试实际运行。
### 步骤 2:识别问题
如果测试因环境设置问题而失败,请分析问题是否来自:
- Dockerfile(例如,错误的依赖项、错误的操作系统、缺少配置)。
- 评估脚本(例如,错误的测试命令、错误的路径、缺少环境激活、与黄金补丁解决的单元测试不匹配)。
- 直接忽略 conda update / pip update 警告,除非它是错误的根本原因。
- 有时,测试可能因特定依赖项版本不正确而失败。请务必检查关键依赖项的版本以确保兼容性。
- 如果存在缺失的依赖项或未知错误,请考虑是否需要额外的上下文检索。
- 不应在 Dockerfile 中运行测试;在环境搭建期间跳过测试,并在评估脚本中运行它们。
- 请注意,评估脚本必须在运行测试后捕获退出码,并回显 "OPENSWE_EXIT_CODE=$rc"。这对评判程序判断测试是否成功运行很重要。
### 步骤 3:规划纠正措施
如果需要在 Dockerfile 中进行修复,请向 write_dockerfile_agent 提供如何修复的指导,始终包含原始错误消息以及关于缺失内容或疑似原因的简要描述。如果需要在评估脚本中进行修复,请向 write_eval_script_agent 提供如何修复的指导,始终包含原始错误消息以及关于缺失内容或疑似原因的简要描述。如果需要来自目标仓库的更多信息,请向 context_retrieval_agent 提供应收集哪些内容的指导。以下是一些说明:
1. 始终包含原始错误消息以及关于缺失内容或疑似原因的简要描述。
2. 明确指定应搜索哪些信息或文件。对于环境或依赖项问题,建议查看 requirements.txt、environment.yml、Dockerfile、setup.py、pyproject.toml 等文件。对于测试或评估问题,建议查看 eval.sh、pytest.ini、.github/workflows/ 等文件。
3. 此外,鼓励查看文档文件,如 README.md、CONTRIBUTING.md 或根目录或 docs/ 目录中的任何文档,以获取相关的搭建或测试说明(Contributing 文件通常包含一些测试说明)。
4. 如果你向 context_retrieval_agent 提供指导,则必须同时向 dockerfile agent 或 eval script agent 中的至少一个提供指导,否则不会有任何内容被重写,错误将重演。
- 如果遇到网络问题,只需将所有指导字段留空并将 is_finish 设置为 false;我们将重新运行它。
- 如果你认为问题无法解决,你可以简单地将 is_finish 设置为 true,以节省精力;例如:
1. 黄金补丁未解决任何单元测试。
2. 项目的依赖项存在无法解决的冲突。
3. 某些依赖项已丢失,例如 404 文件、超旧版本(numpy < 1.8)....
### 输出示例
以 JSON 格式提供你的答案:
json
{
"is_finish": true/false, # 如果测试通过且一切正确,或者问题被视为无法解决,则将其设置为 true。
"guidance_for_write_dockerfile_agent": "如果需要修改,请提供详细指导",
"guidance_for_write_eval_script_agent": "如果需要修改,请提供详细指导",
"guidance_for_context_retrieval_agent": "如果需要,请指定需要从目标仓库获取哪些额外信息",
}
重要说明:
- 如果 is_finish 为 true,则所有指导字段可以为空。
- 在指导中要具体,提供必要修复的详细步骤。仅根据实际问题向相关智能体提供指导。
- 对于任何未被调用的智能体,其指导字段必须为空。
- 调用 context_retrieval_agent 成本很高。仅当明显缺少修复 Dockerfile 或评估脚本所必需的信息时,才建议使用它。在检索内容时要精确和具体(例如,特定文件或配置脚本),以避免重复或模糊搜索。提供详细的错误信息,以告知智能体发生了哪些错误。
- 中文翻译:
附录 B:Construction Cost Estimate
- 基于表 1 中的 64 节点配置,本文在表 6 中提供了一个大约为期 10 天的构建成本估算
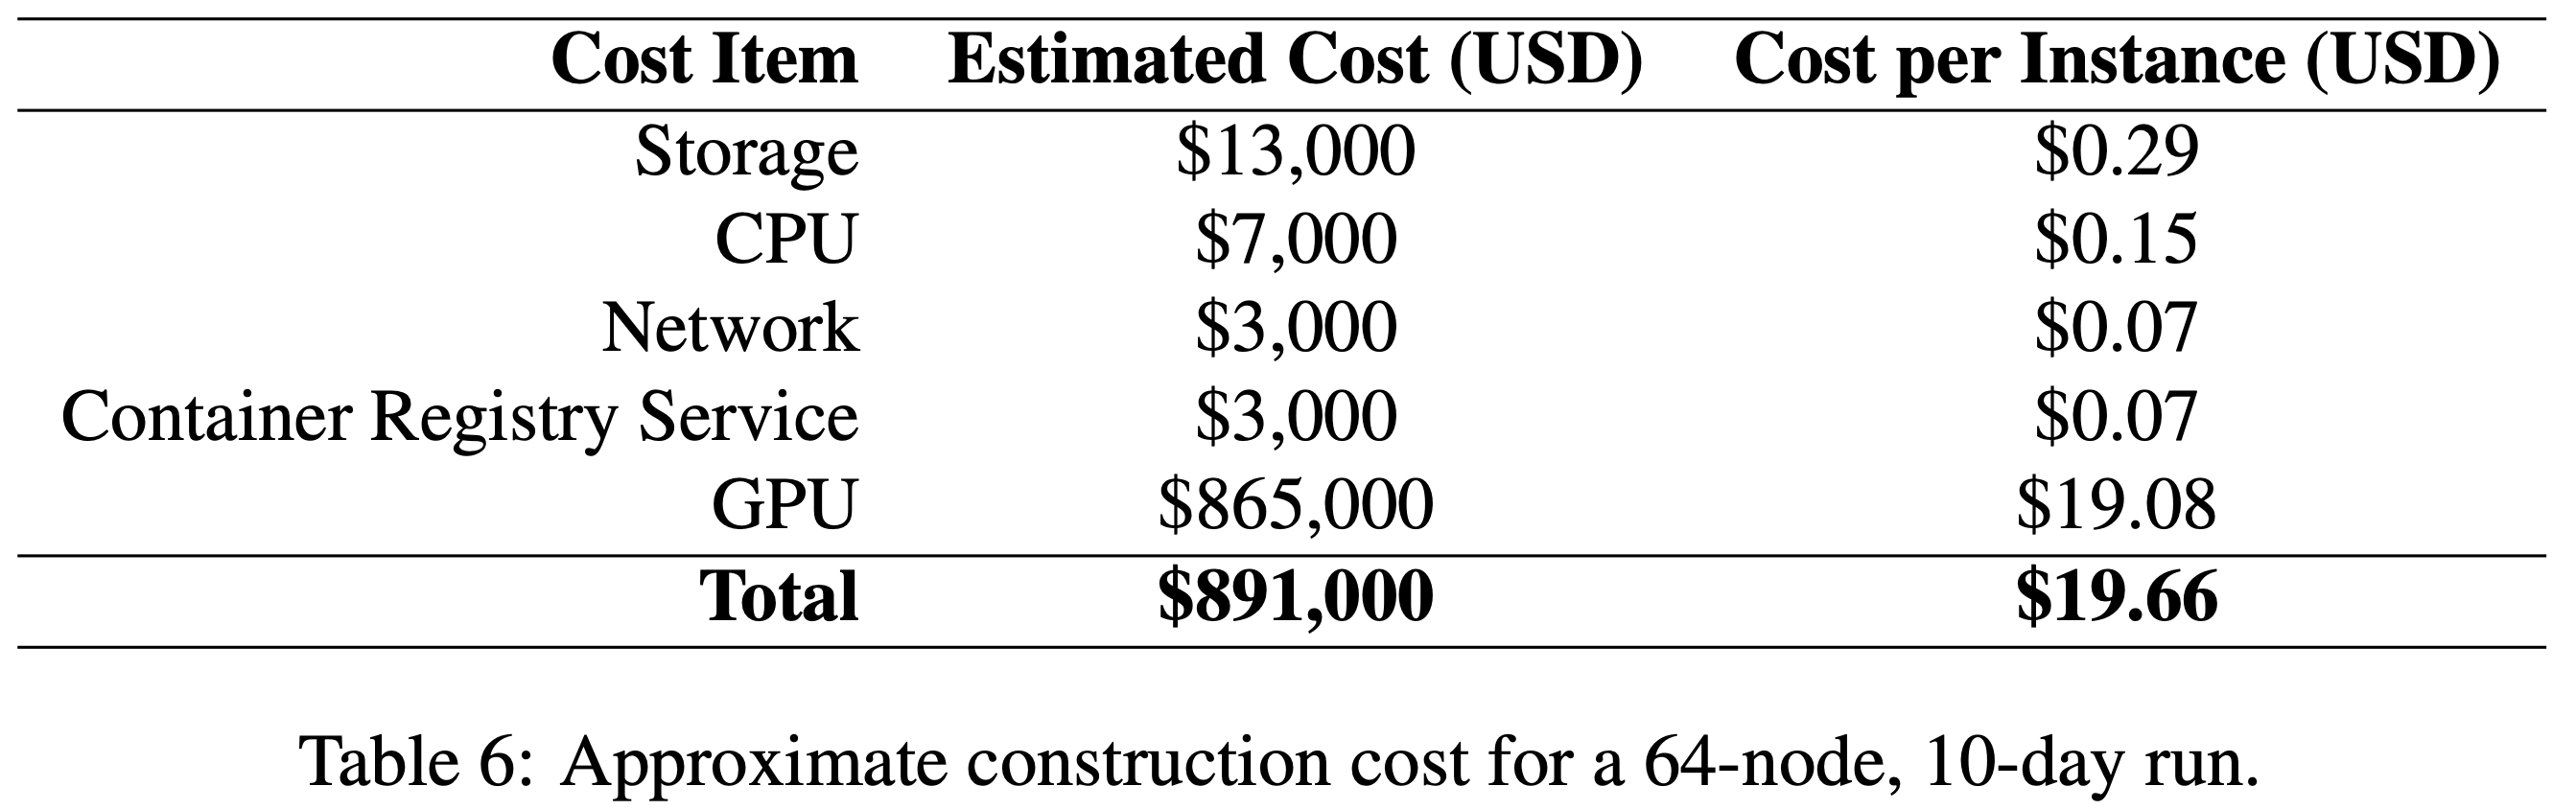
- 总建设预算主要对有效的 GPU 小时价格和集群利用效率敏感
- 在实践中,抢占式定价、承诺使用折扣和调度效率可能会显著改变最终金额
Curation Cost
- 除了环境构建之外,轨迹采样和难度感知策展过程还需要大约 $576,000 的额外计算投资
- 此成本主要包括使用 GLM-4.7 模型在整个 OpenSWE 和 SWE-rebench 数据集上生成解决轨迹的 LLM API 费用(在每个实例下使用 OpenHands 和 SWE-Agent 框架进行四次尝试),以及在相应环境中执行每条轨迹的相关 Docker 计算成本
- 结合环境构建预算,OpenSWE 项目的总成本超过 \(1.47M\) 美元